6. Accuracy Tuning Suggestions#
During the deployment process, some accuracy loss is inevitable. This document is used to guide users to troubleshoot accuracy loss.
Usually, you can roughly judge the accuracy loss during the model conversion process by comparing the accuracy of each layer. The method to enable it is as follows:
{
    ...
    "quant": {
        "precision_analysis": true,
        "precision_analysis_mode": "NPUBackend",
        "precision_analysis_method": "EndToEnd"
    },
    ...
}
In this way, a layer-by-layer cosine similarity table will be output during the compilation process. If the cosine similarity of the final output layer of the model is larger than 98% , it can be roughly judged that the accuracy of the quantized model is normal, and the accuracy can be verified on the board.
If the above indicators are not achieved or the actual board accuracy error of the model is large, we recommend that you refer to the following chapters for accuracy tuning.
6.1. Causes of loss of precision#
There are many reasons for precision loss, which can be roughly divided into two categories: model conversion precision loss and deployment precision loss .
Model conversion precision loss refers to the precision loss caused by floating point quantization to low bit and hardware implementation differences during the execution of Pulsar2 build.
Deployment precision loss refers to the precision loss caused by the misalignment of pre-processing and post-processing during the conversion of training-side code to actual deployment code.
We recommend that you first check the precision loss in the deployment process, and then check the model conversion precision loss.
6.2. Deployment accuracy loss#
During deployment, misalignment of front-end and back-end processing is often a significant cause of accuracy loss.
6.2.1. Eliminate distractions#
To avoid interference when troubleshooting pre- and post-processing problems, in the configuration file, input_processors should be explicitly configured to be consistent with the floating-point model. For example, for an input with shape 1x3x224x224, the configuration file should be as follows:
{
  ...
  "input_processors": [
    {
      "tensor_name": "DEFAULT",
      "tensor_format": "BGR",
      "tensor_layout": "NCHW",
      "src_format": "BGR",
      "src_dtype": "FP32",
      "src_layout": "NCHW",
      "mean": [0,0,0],
      "std": [1,1,1]
    }
  ],
  "output_processors": [
    {
      "tensor_name": "DEFAULT"
    }
  ],
  ...
}
After the compilation is complete, you can use netron to check whether the compiled compiled.axmodel input is consistent with the type and shape of the floating-point model. For example:
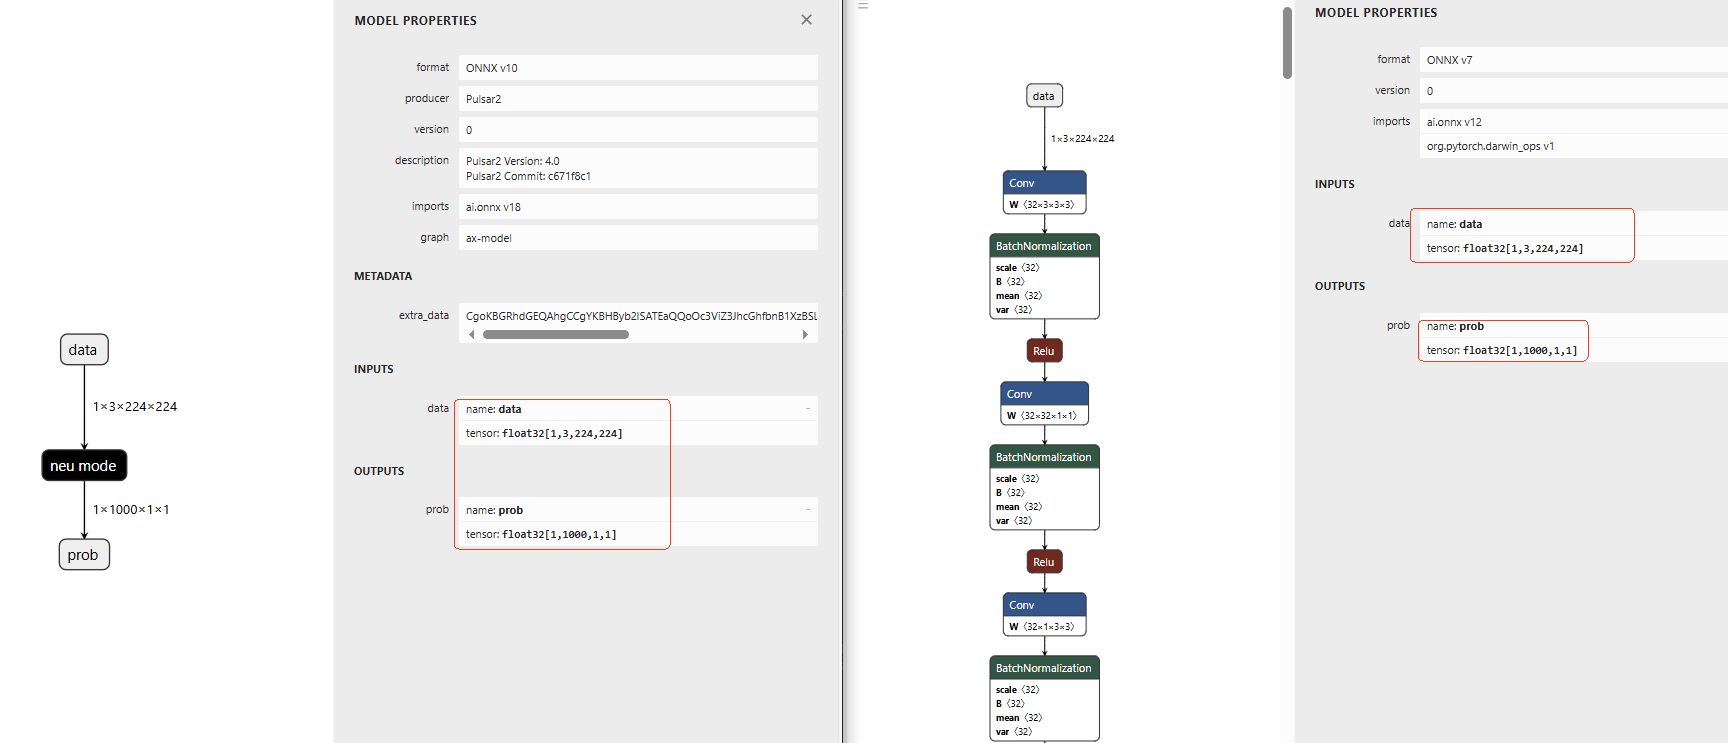
This ensures that the compiled model has the same input and output types as the floating-point model.
6.2.2. Alignment pre- and post-processing#
The following process is used to align the pre- and post-processing during board loading and the pre- and post-processing during inference in the training phase.

For single data, use the Python inference code during training to save the original input, preprocessed data, model output, and post-processed data into a bin file; the results can be visualized here to ensure the correctness of the output
Board test preprocessing: read the original data saved in the previous step as input, get the board preprocessed results, compare with the preprocessed data saved in the previous step, when the error between the two is within 0.0001 (1e-4), the error is considered to be in line with expectations, that is, (a - b) < 0.0001.
Board test postprocessing: read the model output saved in the first step as the model output, and calculate the postprocessing, get the board postprocessing results, compare with the postprocessed data saved in the first step, when the element-by-element comparison error between the two is within 0.001 (1e-3), the error is considered to be in line with expectations..
Hint
The python implementation pyaxengine is also available on GitHub. Its interface is fully aligned with onnxruntime and can be used to eliminate the precision loss caused by the misalignment of front and back processing.
6.3. Model conversion accuracy loss#
Model conversion will also cause a certain loss of accuracy. We recommend that you follow the process of basic problem troubleshooting and quantitative accuracy tuning.
6.3.1. Basic troubleshooting#
When troubleshooting accuracy issues, first confirm the following options before tuning accuracy:
mean/std is consistent with that used during training: If the format of the dataset used for quantization is
Image, please make sure thatcalibration_meanandcalibration_stdunderinput_configsinquantare consistent with those used during training.BGR and RGB formats: If the format of the dataset used for quantization is
Image, please make sure thattensor_layoutininput_processorsis consistent with that used during training.- Is the quantization dataset correct:
The calibration images should be as similar as possible to the usage scenarios
Is the number of calibration sets rich enough to cover all categories as much as possible
6.3.2. Quantization accuracy tuning#
Improve model accuracy by changing the quantization strategy. Currently, you can try MSE Percentile MinMax, which corresponds to calibration_method in the quant field.

If the cosine similarity is still low after changing the quantization strategy, you can adjust the quantization bit width according to the cosine similarity in Quant Precision Table 【PerLayer Reference】. The specific process is shown in the figure below.

Note
It should be noted that the cosine similarity of the quantitative accuracy analysis tool in the compilation stage is not equivalent to the accuracy drop on the test dataset (such as AP, mAP).
If you want to understand the detailed accuracy drop of the dataset, it is recommended to use the compiled model to test the model accuracy using the dataset.
6.3.3. Hardware precision implementation differences#
The option "precision_analysis_mode" in the configuration file can have two optional values:
"Reference" : When performing layer-by-layer accuracy comparison, the inference engine of the quantized model is the reference implementation, and the actual operator inference is performed using the
PyTorch / Numpyimplementation."NPUBackend" : When performing layer-by-layer accuracy comparison, the inference engine of the quantized model is the backend simulation implementation, and the corresponding
NPU Backendsimulation implementation is used.
It is expected that the results of "Reference" and "NPUBackend" are close. If the difference is large, there may be some errors in the NPU Backend simulation operator implementation. In this case, it is recommended to feedback the detailed log to FAE.
6.4. Quantitative chemical single template#
Please fill in the following items in detail and submit to FAE/AE.
- Experience with other platforms
Have you deployed on other platforms before?
Corresponding manufacturers, chip models, and corresponding toolchain versions
Quantization scripts or configuration files for other platforms
Commands for executing quantization on other platforms
Corresponding dataset indicators: floating point accuracy/board runtime accuracy/accuracy indicators
- Provide a minimum reproducible case:
onnx floating point model
Single image test case of onnx floating point model, either python or C++ is OK
config.json configuration file
Minimum dataset for quantization
Pulsar2 compilation command
6.5. Q&A#
6.5.1. How to set the model to full U16?#
{
   "layer_configs": [
       {
           "start_tensor_names": ["DEFAULT"], # string of list
           "end_tensor_names": ["DEFAULT"],   # string of list
           "data_type": "U16"
       }
     ]
 }
6.5.2. Why configure the Add operator quantization bit width is U16 in the cosine similarity table to see the type or U8?#
The toolchain will first do a floating point optimization of the input floating point model before quantizing, then the configured operator name/operator type may not appear in the floating point optimized model
optimized.onnx. Then can open the output directoryoutput/frontend/optimized onnxcheck whether there is the operator.The output of the quantized model may be different from the input type, and the operator output type and configuration in the cosine similarity table will often be different, because the input type of the next operator may not be configured to be the same bit width, then the output type of the operator will be set to the input type of the next operator to improve the inference performance. This optimization does not affect accuracy.
If data transfer class operators such as
Reshape/Transpose, setting the type of the class operators will not take effect. Their types are determined by the downstream type of the calculation class operators.
6.5.3. What to do if the outlier is too large?#
The following log appears in the model, indicating that there are a lot of outliers in the activation value of the model, we recommend using the smooth quant function to reduce these outliers.
                                        Ratio of outliers in tensor【 level=Log(Max_Pertensor/Max_Perchannel) 】
┏━━━━━━━━━━━━━━━━━━━━━━━━━━━━━━━━━━━┳━━━━━━━━━━━━━━━━━━━━━━┳━━━━━━━━━━━━━━━━━━━━┳━━━━━━━━━━━━━━━━━━━━━━━┳━━━━━━━━━━━━━━━━━━━━━━━┳━━━━━━━━━━━━━━━━━━━━━━━┓
┃ Op outputs                        ┃ Sparse channel ratio ┃ level>=3 ratio     ┃ level>=4 ratio        ┃ level>=5 ratio        ┃ level>=6 ratio        ┃
┡━━━━━━━━━━━━━━━━━━━━━━━━━━━━━━━━━━━╇━━━━━━━━━━━━━━━━━━━━━━╇━━━━━━━━━━━━━━━━━━━━╇━━━━━━━━━━━━━━━━━━━━━━━╇━━━━━━━━━━━━━━━━━━━━━━━╇━━━━━━━━━━━━━━━━━━━━━━━┩
│ /vision_model/embeddings/patch_e… │ 0.0                  │ 0.6614583134651184 │ 0.3111979067325592    │ 0.00390625            │ 0.0                   │
├───────────────────────────────────┼──────────────────────┼────────────────────┼───────────────────────┼───────────────────────┼───────────────────────┤
│ op_348:onnx.LayerNormalization_0… │ 0.0                  │ 0.921875           │ 0.5169270634651184    │ 0.1080729141831398    │ 0.0403645820915699    │
├───────────────────────────────────┼──────────────────────┼────────────────────┼───────────────────────┼───────────────────────┼───────────────────────┤
│ op_396:onnx.LayerNormalization_0… │ 0.0                  │ 0.4427083432674408 │ 0.2473958283662796    │ 0.12109375            │ 0.0546875             │
├───────────────────────────────────┼──────────────────────┼────────────────────┼───────────────────────┼───────────────────────┼───────────────────────┤
│ op_821:onnx.AxFullyConnected_q_0… │ 0.0                  │ 0.359375           │ 0.1875                │ 0.125                 │ 0.0625                │
├───────────────────────────────────┼──────────────────────┼────────────────────┼───────────────────────┼───────────────────────┼───────────────────────┤
│ op_821:onnx.AxFullyConnected_k_0… │ 0.0                  │ 0.203125           │ 0.078125              │ 0.0625                │ 0.015625              │
├───────────────────────────────────┼──────────────────────┼────────────────────┼───────────────────────┼───────────────────────┼───────────────────────┤
│ op_821:onnx.AxFullyConnected_v_0… │ 0.0                  │ 0.453125           │ 0.203125              │ 0.078125              │ 0.03125               │
├───────────────────────────────────┼──────────────────────┼────────────────────┼───────────────────────┼───────────────────────┼───────────────────────┤
│ op_821:onnx.AxFullyConnected_q_1… │ 0.0                  │ 0.234375           │ 0.125                 │ 0.109375              │ 0.015625              │
├───────────────────────────────────┼──────────────────────┼────────────────────┼───────────────────────┼───────────────────────┼───────────────────────┤
│ op_821:onnx.AxFullyConnected_k_1… │ 0.0                  │ 0.3125             │ 0.140625              │ 0.046875              │ 0.015625              │
├───────────────────────────────────┼──────────────────────┼────────────────────┼───────────────────────┼───────────────────────┼───────────────────────┤
│ op_821:onnx.AxFullyConnected_v_1… │ 0.0                  │ 0.21875            │ 0.03125               │ 0.015625              │ 0.0                   │
├───────────────────────────────────┼──────────────────────┼────────────────────┼───────────────────────┼───────────────────────┼───────────────────────┤
│ op_821:onnx.AxFullyConnected_q_2… │ 0.0                  │ 0.296875           │ 0.203125              │ 0.140625              │ 0.09375               │
├───────────────────────────────────┼──────────────────────┼────────────────────┼───────────────────────┼───────────────────────┼───────────────────────┤
│ op_821:onnx.AxFullyConnected_k_2… │ 0.0                  │ 0.234375           │ 0.109375              │ 0.0625                │ 0.015625              │
├───────────────────────────────────┼──────────────────────┼────────────────────┼───────────────────────┼───────────────────────┼───────────────────────┤
│ op_821:onnx.AxFullyConnected_v_2… │ 0.0                  │ 0.234375           │ 0.125                 │ 0.078125              │ 0.078125              │
├───────────────────────────────────┼──────────────────────┼────────────────────┼───────────────────────┼───────────────────────┼───────────────────────┤
│ op_821:onnx.AxFullyConnected_q_3… │ 0.0                  │ 0.25               │ 0.09375               │ 0.078125              │ 0.03125               │
├───────────────────────────────────┼──────────────────────┼────────────────────┼───────────────────────┼───────────────────────┼───────────────────────┤
│ op_821:onnx.AxFullyConnected_k_3… │ 0.0                  │ 0.1875             │ 0.109375              │ 0.03125               │ 0.015625              │
├───────────────────────────────────┼──────────────────────┼────────────────────┼───────────────────────┼───────────────────────┼───────────────────────┤
│ op_821:onnx.AxFullyConnected_v_3… │ 0.0                  │ 0.296875           │ 0.15625               │ 0.0625                │ 0.0                   │
├───────────────────────────────────┼──────────────────────┼────────────────────┼───────────────────────┼───────────────────────┼───────────────────────┤
│ op_821:onnx.AxFullyConnected_q_4… │ 0.0                  │ 0.234375           │ 0.171875              │ 0.0625                │ 0.046875              │
├───────────────────────────────────┼──────────────────────┼────────────────────┼───────────────────────┼───────────────────────┼───────────────────────┤
│ op_821:onnx.AxFullyConnected_k_4… │ 0.0                  │ 0.359375           │ 0.203125              │ 0.09375               │ 0.046875              │
This feature can be enabled by configuring enable_smooth_quant in the quant field.
Hint
The method comes from the paper SmoothQuant
6.5.4. csc mode configuration#
If
csc_modeis set to anything other than YUYV422, UYVY422, YUV420SP, YVU420SP, it is recommended to use IVE TDP for resize when testing the accuracy on the board. This preprocessing is aligned with thebilinearinterpolation method of Opencv.The csc conversion does not include
RGB2BGRandBGR2RGB. Whensrc_formatis configured asBGRorBGR, no conversion is actually performed in the compiled model.