9. 模型转换进阶指南#
9.1. 概述#
pulsar2 build 用于模型 图优化、 量化、 编译 等操作. 其运行示意图如下:
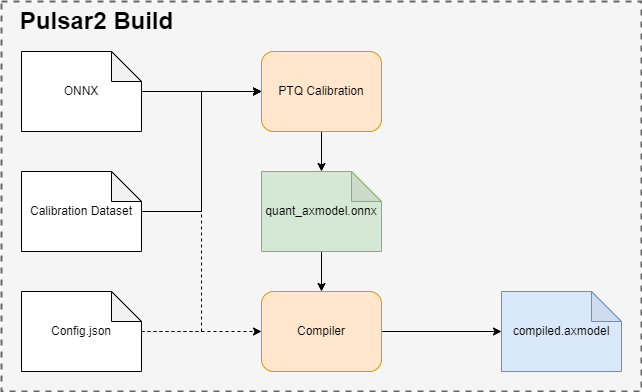
pulsar2 build利用输入模型(model.onnx)、PTQ校准数据(calibration.tar)和配置文件(config.json), 生成输出模型(axmodel).pulsar2 build的命令行参数将会覆盖配置文件中的某些对应部分, 并使pulsar2 build将覆盖过后得到的配置文件输出出来. 配置文件的详细介绍参见 《配置文件详细说明》.
9.2. 模型编译详解#
本节介绍 pulsar2 build 命令完整使用方法.
pulsar2 build -h 可显示详细命令行参数:
  1  usage: main.py build [-h] [--config] [--input] [--output_dir] [--output_name]
  2                       [--work_dir] [--model_type] [--target_hardware]
  3                       [--npu_mode] [--input_shapes]
  4                       [--onnx_opt.disable_onnx_optimization ]
  5                       [--onnx_opt.enable_onnxsim ] [--onnx_opt.model_check ]
  6                       [--onnx_opt.disable_transformation_check ]
  7                       [--onnx_opt.save_tensors_data ]
  8                       [--quant.calibration_method]
  9                       [--quant.precision_analysis ]
 10                       [--quant.precision_analysis_method]
 11                       [--quant.precision_analysis_mode]
 12                       [--quant.highest_mix_precision ]
 13                       [--quant.conv_bias_data_type]
 14                       [--quant.refine_weight_threshold]
 15                       [--quant.enable_smooth_quant ]
 16                       [--quant.smooth_quant_threshold]
 17                       [--quant.smooth_quant_strength]
 18                       [--quant.transformer_opt_level]
 19                       [--quant.input_sample_dir] [--quant.ln_scale_data_type]
 20                       [--quant.check] [--quant.disable_auto_refine_scale ]
 21                       [--quant.enable_easy_quant ]
 22                       [--quant.disable_quant_optimization ]
 23                       [--quant.enable_brecq ] [--quant.enable_lsq ]
 24                       [--quant.enable_adaround ] [--quant.finetune_epochs]
 25                       [--quant.finetune_block_size]
 26                       [--quant.finetune_batch_size] [--quant.finetune_lr]
 27                       [--quant.device] [--compiler.static_batch_sizes [...]]
 28                       [--compiler.max_dynamic_batch_size]
 29                       [--compiler.ddr_bw_limit] [--compiler.disable_ir_fix ]
 30                       [--compiler.check] [--compiler.npu_perf ]
 31                       [--compiler.check_mode] [--compiler.check_rtol]
 32                       [--compiler.check_atol]
 33                       [--compiler.check_cosine_simularity]
 34                       [--compiler.check_tensor_black_list [...]]
 35                       [--compiler.enable_slice_mode ]
 36                       [--compiler.enable_tile_mode ]
 37                       [--compiler.enable_data_soft_compression ]
 38                       [--compiler.input_sample_dir]
 39
 40  options:
 41    -h, --help            show this help message and exit
 42    --config              config file path, supported formats: json / yaml /
 43                          toml / prototxt. type: string. required: false.
 44                          default:.
 45    --input               input model file path. type: string. required: true.
 46    --output_dir          axmodel output directory. type: string. required:
 47                          true.
 48    --output_name         rename output axmodel. type: string. required: false.
 49                          default: compiled.axmodel.
 50    --work_dir            temporary data output directory. type: string.
 51                          required: false. default: same with ${output_dir}.
 52    --model_type          input model type. type: enum. required: false.
 53                          default: ONNX. option: ONNX, QuantAxModel, QuantONNX.
 54    --target_hardware     target hardware. type: enum. required: false. default:
 55                          AX650. option: AX650, AX620E, AX615, M76H, M57.
 56    --npu_mode            npu mode. while ${target_hardware} is AX650, npu mode
 57                          can be NPU1 / NPU2 / NPU3. while ${target_hardware} is
 58                          AX620E or AX615, npu mode can be NPU1 / NPU2. type: enum.
 59                          required: false. default: NPU1.
 60    --input_shapes        modify model input shape of input model, this feature
 61                          will take effect before the `input_processors`
 62                          configuration. format:
 63                          input1:1x3x224x224;input2:1x1x112x112. type: string.
 64                          required: false. default: .
 65    --onnx_opt.disable_onnx_optimization []
 66                          disable onnx optimization. type: bool. required:
 67                          false. default: false.
 68    --onnx_opt.enable_onnxsim []
 69                          enable onnx simplify by
 70                          https://github.com/daquexian/onnx-simplifier. type:
 71                          bool. required: false. default: false.
 72    --onnx_opt.model_check []
 73                          enable model check. type: bool. required: false.
 74                          default: false.
 75    --onnx_opt.disable_transformation_check []
 76                          disable transformation check. type: bool. required:
 77                          false. default: false.
 78    --onnx_opt.save_tensors_data []
 79                          save tensors data to optimize memory footprint. type:
 80                          bool. required: false. default: false.
 81    --quant.calibration_method
 82                          quantize calibration method. type: enum. required:
 83                          false. default: MinMax. option: MinMax, Percentile,
 84                          MSE, KL.
 85    --quant.precision_analysis []
 86                          enable quantization precision analysis. type: bool.
 87                          required: false. default: false.
 88    --quant.precision_analysis_method
 89                          precision analysis method. type: enum. required:
 90                          false. default: PerLayer. option: PerLayer, EndToEnd.
 91    --quant.precision_analysis_mode
 92                          precision analysis mode. type: enum. required: false.
 93                          default: Reference. option: Reference, NPUBackend.
 94    --quant.highest_mix_precision []
 95                          enable highest mix precision quantization. type: bool.
 96                          required: false. default: false.
 97    --quant.conv_bias_data_type
 98                          conv bias data type. type: enum. required: false.
 99                          default: S32. option: S32, FP32.
100    --quant.refine_weight_threshold
101                          refine weight threshold, should be a legal float
102                          number, like 1e-6. -1 means disable this feature.
103                          type: float. required: false. default: 1e-6.
104                          limitation: 0 or less than 0.0001.
105    --quant.enable_smooth_quant []
106                          enalbe smooth quant strategy. type: bool. required:
107                          false. default: false.
108    --quant.smooth_quant_threshold
109                          smooth quant threshold. The larger the threshold, the
110                          more operators will be involved in performing
111                          SmoothQuant. limitation: 0~1.
112    --quant.smooth_quant_strength
113                          smooth quant strength, a well-balanced point to evenly
114                          split the quantization difficulty.
115    --quant.transformer_opt_level
116                          tranformer opt level. type: int. required: false.
117                          default: 0. limitation: 0~2.
118    --quant.input_sample_dir
119                          input sample data dir for precision analysis. type:
120                          string. required: false. default: .
121    --quant.ln_scale_data_type
122                          LayerNormalization scale data type. type: enum.
123                          required: false. default: FP32. option: FP32, S32,
124                          U32.
125    --quant.check         quant check level, 0: no check; 1: check node dtype.
126                          type: int. required: false. default: 0.
127    --quant.disable_auto_refine_scale []
128                          refine weight scale and input scale, type: bool.
129                          required: false. default: false.
130    --quant.enable_easy_quant []
131                          enable easyquant; type bool. required: false. default:
132                          false.
133    --quant.disable_quant_optimization []
134                          disable quant optimization; type bool. required:
135                          false. default: false.
136    --quant.enable_brecq []
137                          enable brecq quantize strategy; type bool. required:
138                          false. default: false.
139    --quant.enable_lsq []
140                          enable lsq quantize strategy; type bool. required:
141                          false. default: false.
142    --quant.enable_adaround []
143                          enable adaround quantize strategy; type bool.
144                          required: false. default: false.
145    --quant.finetune_epochs
146                          finetune epochs when enable finetune algorithm; type
147                          int32. required: false. default: 500.
148    --quant.finetune_block_size
149                          finetune split block size when enable finetune
150                          algorithm; type int32. required: false. default: 4.
151    --quant.finetune_batch_size
152                          finetune batch size when enable finetune algorithm;
153                          type int32. required: false. default: 1.
154    --quant.finetune_lr   learning rate when enable finetune algorithm; type
155                          float. required: false. default: 1e-3.
156    --quant.device        device for quant calibration. type: string. required:
157                          false. default: cpu. option: cpu, cuda:0, cuda:1, ...,
158                          cuda:7.
159    --compiler.static_batch_sizes [ ...]
160                          static batch sizes. type: int array. required: false.
161                          default: [].
162    --compiler.max_dynamic_batch_size
163                          max dynamic batch. type: int, required: false.
164                          default: 0.
165    --compiler.ddr_bw_limit
166                          ddr bandwidth limit in GB, 0 means no limit. type:
167                          int. required: false. default: 0.
168    --compiler.disable_ir_fix []
169                          disable ir fix, only work in multi-batch compilation.
170                          type: bool. required: false. default: false.
171    --compiler.check      compiler check level, 0: no check; 1: assert all
172                          close; 2: assert all equal; 3: check cosine
173                          simularity. type: int. required: false. default: 0.
174    --compiler.npu_perf []
175                          dump npu perf information for profiling. type: bool.
176                          required: false. default: false.
177    --compiler.check_mode
178                          compiler check mode, CheckOutput: only check model
179                          output; CheckPerLayer: check model intermediate tensor
180                          and output. type: enum. required: false. default:
181                          CheckOutput. option: CheckOutput, CheckPerLayer.
182    --compiler.check_rtol
183                          relative tolerance when check level is 1. type: float.
184                          required: false. default: 1e-5.
185    --compiler.check_atol
186                          absolute tolerance when check level is 1. type: float.
187                          required: false. default: 0.
188    --compiler.check_cosine_simularity
189                          cosine simularity threshold when check level is 3.
190                          type: float. required: false. default: 0.999.
191    --compiler.check_tensor_black_list [ ...]
192                          tensor black list for per layer check, support regex.
193                          type: list of string. required: false. default: [].
194    --compiler.enable_slice_mode []
195                          enable slice mode scheduler. type: bool. required:
196                          false. default: false.
197    --compiler.enable_tile_mode []
198                          enable tile mode scheduler. type: bool. required:
199                          false. default: false.
200    --compiler.enable_data_soft_compression []
201                          enable data soft compression. type: bool. required:
202                          false. default: false.
203    --compiler.input_sample_dir
204                          input sample data dir for compiler check. type:
205                          string. required: false. default: .
提示
用户可以根据参数规格编写
json / yaml / toml / prototxt格式的配置文件,通过命令行参数--config指向配置文件部分编译参数支持命令行传入,且优先级高于配置文件,通过
pulsar2 build -h查看支持的命令行编译参数,比如命令行参数--quant.calibration_method相当于配置了QuantConfig结构体的calibration_method字段
9.2.1. 参数详解#
- pulsar2 build 参数解释
- --config
数据类型:string
是否必选:是
描述:配置文件路径,支持
json / yaml / toml / prototxt格式,结构体见 《配置文件详细说明》
- --work_dir
数据类型:string
是否必选:否
默认值:与 output_dir 相同
描述:中间结果输出目录
- --input
数据类型:string
是否必选:是
描述:输入模型路径
- --output_dir
数据类型:string
是否必选:是
描述:编译结果输出目录,编译后的模型命名为 compiled.axmodel
- --model_type
数据类型:enum
是否必选:否
默认值:ONNX
描述:输入模型类型,支持枚举:
ONNX,QuantAxModel,QuantONNX
- --target_hardware
数据类型:enum
是否必选:否
默认值:AX650
描述:模型编译的目标 soc 平台类型,支持
AX650,AX620E,AX615,M76H,M57
- --npu_mode
数据类型:enum
是否必选:否
默认值:NPU1
描述:模型编译模式
soc 平台为
AX650时,支持枚举:NPU1,NPU2,NPU3soc 平台为
AX620E时,支持枚举:NPU1,NPU2soc 平台为
AX615时,支持枚举:NPU1,NPU2
警告
npu_mode 指的是使用的 NPU 核数,而不是 vNPU 编号,请不要混淆。
- --input_shapes
数据类型:string
是否必选:否
默认值:空
描述:模型编译过程中,修改模型的输入尺寸,格式为:
input1:1x3x224x224;input2:1x1x112x112。
- --onnx_opt
disable_onnx_optimization
数据类型:bool
是否必选:否
默认值:false
描述:是否使能浮点 ONNX 模型图优化模块。
enable_onnxsim
数据类型:bool
是否必选:否
默认值:false
描述:是否使用 onnxsim 工具简化浮点 ONNX,daquexian/onnx-simplifier。
model_check
数据类型:bool
是否必选:否
默认值:false
描述:是否使能浮点 ONNX 模型图优化结束后与原始 ONNX 模型的对分功能。
disable_transformation_check
数据类型:bool
是否必选:否
默认值:false
描述:在浮点 ONNX 模型图优化过程中,是否禁用每次子图变换后的子图对分功能。
- --quant
在 BuildConfig 中是名为 quant 的成员变量
calibration_method
数据类型:enum
是否必选:否
默认值:MinMax
描述:量化算法,支持的枚举
MinMax/Percentile/MSE/KL, 结构体见 《配置文件详细说明》
precision_analysis
数据类型:bool
是否必选:否
默认值:false
描述:是否逐层分析 Quant AXModel 的量化精度
precision_analysis_method
数据类型:enum
是否必选:否
默认值:PerLayer
描述:精度分析方法,可选
PerLayer/EndToEnd。PerLayer意味着每一层都采用浮点模型对应的层输入,计算每一层的输出与浮点模型输出的相似度。EndToEnd代表首层采用浮点模型输入,然后进行完整模型的仿真,计算最终输出结果与浮点模型输出的相似度。
precision_analysis_mode
数据类型:enum
是否必选:否
默认值:Reference
描述:逐层仿真的实现,可选
Reference/NPUBackend。Reference可以运行编译器支持的全部模型(支持包含 CPU 及 NPU 子图的模型),但是计算结果相比于最终上板结果会有少量误差(基本上差距在正负 1 内,且无系统性误差)。NPUBackend可以运行仅包含 NPU 子图的模型,但是计算结果与上板结果比特对齐。
highest_mix_precision
数据类型:bool
是否必选:否
默认值:false
描述:是否使能最高精度量化模式。
conv_bias_data_type
数据类型:enum
是否必选:否
默认值:S32
描述:量化时 Conv 算子 Bias 属性保存的数据类型,可选 S32 / FP32。
refine_weight_threshold
数据类型:float
是否必选:否
默认值:1e-6
描述:将权重量化阈值调整至指定值。
enable_smooth_quant
数据类型:bool
是否必选:否
默认值:false
描述:使能 smooth quant 量化策略以提升量化精度。
enable_easy_quant
数据类型:bool
是否必选:否
默认值:false
描述:使能 easyquant 量化算法,是一种搜索权重和激活值的量化方法,精度较高。目前基于 cpu 实现,成功开启该功能后会占用一半的 cpu 并且耗时较长,建议在精度不足时开启该功能,量化数据集数量设置大于 32 张。该量化算法参考自 https://arxiv.org/abs/2006.16669。
disable_quant_optimization
数据类型:bool
是否必选:否
默认值:false
描述:禁止量化部分的图优化功能,默认值为false. 量化时会对图做一定的变换来消除或者合并算子,该功能用于排查量化时图优化过程中可能存在的问题。需要注意,使能该功能时可能会导致模型性能下降。
enable_brecq
数据类型:bool
是否必选:否
默认值:false
描述:是否使能 BRECQ 量化算法。
enable_lsq
数据类型:bool
是否必选:否
默认值:false
描述:是否使能 LSQ 量化算法。
enable_adaround
数据类型:bool
是否必选:否
默认值:false
描述:是否使能 ADAROUND 量化算法。
finetune_epochs
数据类型:int
是否必选:否
默认值:500
描述:使能 BRECQ / LSQ / ADAROUND 量化算法时,微调轮次。
finetune_block_size
数据类型:int
是否必选:否
默认值:4
描述:使能 BRECQ / LSQ / ADAROUND 量化算法时, block 大小。
finetune_batch_size
数据类型:int
是否必选:否
默认值:4
描述:使能 BRECQ / LSQ / ADAROUND 量化算法时, 设置的 batch size。
finetune_lr
数据类型:float
是否必选:否
默认值:1e-3
描述:使能 BRECQ / LSQ / ADAROUND 量化算法时,学习率大小。
device
数据类型:float
是否必选:否
默认值:cpu
描述:量化过程中校准时使用的 device 类型,支持 "cpu" "cuda:0" "cuda:1" "cuda:2" 等。
transformer_opt_level
数据类型:int
是否必选:否
默认值:0
描述:Transformer 网络的量化方式配置。
input_sample_dir
数据类型:string
是否必选:否
默认值:空
描述:配置用于量化精度分析的输入数据目录,如果未指定,则采用量化校准集中的数据。
备注
注意
--quant.input_sample_dir中的输入数据的格式应与原模型相同。
- --compiler
在 BuildConfig 中是名为 compiler 的成员变量
static_batch_sizes
数据类型:list of int
是否必选:否
默认值:[]
描述:编译器按照用户提供 batch 组合进行编译,基于这一组 batch 模型,可以在运行时支持任意 batch_size 输入的高效推理。详情参考:《静态多 batch 模式》。
max_dynamic_batch_size
数据类型:int
是否必选:否
默认值:0
描述:编译器自动推导出 NPU 可高效运行且不大于 max_dynamic_batch_size 的 batch 模型组合,基于这一组 batch 模型,可以在运行时支持任意 batch_size 输入的高效推理。详情参考:《动态多 batch 模式》。
ddr_bw_limit
数据类型:float
是否必选:否
默认值:0
描述:设置编译时仿真 ddr 带宽限制,单位为 GB。
disable_ir_fix
数据类型:bool
是否必选:否
默认值:false
描述:多 batch 编译时,是否禁止编译器默认的 Reshape 算子属性修改行为。
npu_perf
数据类型:bool
是否必选:否
默认值:false
描述:导出 NPU 编译过程中的调试文件。
check
数据类型:int
是否必选:否
默认值:0
描述:是否通过仿真检查编译结果的正确性,0 代表不做任何检查;1 代表 all close 检查;2 代表 all equal 检查;3 代表 tensor cosine 相似度检查。
check_mode
数据类型:enum
是否必选:否
默认值:0
描述:对分模式,CheckOutput 代表只对结果进行对分。CheckPerLayer 代表逐层对分。
check_rtol
数据类型:float
是否必选:否
默认值:1e-5
描述:当 --compiler.check 参数为 1 时生效,相对误差参数。
check_atol
数据类型:float
是否必选:否
默认值:0
描述:当 --compiler.check 参数为 1 时生效,绝对误差参数。
check_cosine_simularity
数据类型:float
是否必选:否
默认值:0.999
描述:当 --compiler.check 参数为 3 时生效,tensor cosine 相似度检查阈值。
check_tensor_black_list
数据类型:list of string
是否必选:否
默认值:[]
描述:不参与检查的 tensor 列表,支持正则表达式匹配。
enable_slice_mode
数据类型:bool
是否必选:否
默认值:false
描述:使能 slice mode 调度策略,某些情况下可以极大减少 ddr swap 数据量以提高性能。
enable_tile_mode
数据类型:bool
是否必选:否
默认值:false
描述:使能 tile mode 调度策略,某些情况下可以极大减少 ddr swap 数据量以提高性能。
enable_data_soft_compression
数据类型:bool
是否必选:否
默认值:false
描述:使能 compiled.axmodel 中的 NPU 子模型软件压缩功能,可以减少 compiled.axmodel 的尺寸,但是会额外增加一些模型加载时间。
input_sample_dir
数据类型:string
是否必选:否
默认值:空
描述:配置用于编译器检查的输入数据目录,如果未指定,则会优先使用量化校准数据。
备注
注意
--compiler.input_sample_dir中的输入数据的格式应与编译后的模型相同(包含预处理)。
9.3. 多核编译详解#
用户可通过修改 pulsar2 build 中的 --npu_mode 选项灵活配置 NPU编译模式,充分利用算力。
9.3.1. NPU 单核模式#
--npu_mode 默认配置是 NPU1,即 1 个 NPU core 模式。之前的 《模型编译》 章节中均采用 NPU1 默认配置进行说明。
9.3.2. NPU 双核模式#
--npu_mode 配置修改为 NPU2,即 2 个 NPU core 模式。以转换 mobilenetv2 模型举例,修改配置文件如下所示:
{
  "model_type": "ONNX",
  "npu_mode": "NPU2",   # 只需要修改这里,默认配置是 NPU1
  "quant": {
    "input_configs": [
      {
        "tensor_name": "input",
        "calibration_dataset": "./dataset/imagenet-32-images.tar",
        "calibration_size": 32,
        "calibration_mean": [103.939, 116.779, 123.68],
        "calibration_std": [58.0, 58.0, 58.0]
      }
    ],
    "calibration_method": "MinMax",
    "precision_analysis": false
  },
  "input_processors": [
    {
      "tensor_name": "input",
      "tensor_format": "BGR",
      "src_format": "BGR",
      "src_dtype": "U8",
      "src_layout": "NHWC",
      "csc_mode": "NoCSC"
    }
  ],
  "compiler": {
    "check": 0
  }
}
pulsar2 build 编译命令如下:
root@xxx:/data# pulsar2 build --input model/mobilenetv2-sim.onnx --output_dir output --config config/mobilenet_v2_build_config.json
9.4. 多 batch 编译详解#
pulsar2 build 支持用户配置模型的 batch_size,分为静态多 batch 及动态多 batch 编译两种模式,这两种模式互斥。本章节以 AX650 举例。
9.4.1. 静态多 batch 模式#
编译器按照用户提供 batch 组合进行编译,支持命令行参数 --compiler.static_batch_sizes 配置以及修改配置文件中的 compiler.static_batch_sizes 两种方式。
设置静态多 batch 编译后,通过
onnx inspect -m -n -t查看compiled.axmodel时,输入输出 shape 的 batch 维将变为用户指定的最大 batch。batch 之间将尽可能的复用权重数据,因此模型大小相比于单独编译各个 batch 的模型大小总和更小。
提示
以 mobilenetv2 模型为例,原模型输入 input shape 为 [1, 224, 224, 3],
进行 static_batch_sizes 等于 [1, 2, 4] 的静态多 batch 编译后,shape 将变为 [4, 224, 224, 3]。
9.4.2. 动态多 batch 模式#
编译器自动推导出 NPU 可高效运行且不大于 max_dynamic_batch_size 的 batch 模型组合,基于这一组 batch 模型,可以在运行时支持任意 batch_size 输入的高效推理。支持命令行参数 --compiler.max_dynamic_batch_size 配置以及修改配置文件中的 compiler.max_dynamic_batch_size 两种方式。
编译器会从 batch 1 开始,2 倍递增进行编译,当 batch 大于设置的
max_dynamic_batch_size或者当前 batch 理论推理效率低于前一个 batch 时停止。batch 理论推理效率:理论推理耗时 / batch_size。
batch 之间将尽可能的复用权重数据,因此模型大小相比于单独编译各个 batch 的模型大小总和更小。
设置动态多 batch 编译后,通过
onnx inspect -m -n -t查看compiled.axmodel时,输入输出 shape 的 batch 维将变为max_dynamic_batch_size。
提示
以 mobilenetv2 模型为例,原模型输入 input shape 为 [1, 224, 224, 3],
进行 max_dynamic_batch_size 等于 4 的动态多 batch 编译后,shape 将变为 [4, 224, 224, 3]。
运行时,会根据调用者在推理时设置的动态 batch 大小,寻找合适的 batch 组合,进行多次推理。
提示
当一个模型理论推理效率随着 batch 数增加而提高并且编译后仅有一个 NPU 子图,max_dynamic_batch_size 设置为 4 时,编译后的 compiled.axmodel 中会包含 [1, 2, 4] 三个 batch 的模型。
推理或仿真时:
如果设置动态 batch 的值为 3 时,
axengine 推理框架及pulsar2 run 仿真器会在内部进行 batch 2 + batch 1 两次 NPU 推理或仿真。如果设置动态 batch 的值为 9 时,
axengine 推理框架及pulsar2 run 仿真器会在内部进行 batch 4 + batch 4 + batch 1 三次 NPU 推理或仿真。
动态多 batch 编译时,会有以下日志展示出编译出的 batch 组合:
...
2023-07-09 20:06:02.690 | INFO     | yamain.command.build:compile_npu_subgraph:985 - QuantAxModel macs: 280,262,480
2023-07-09 20:06:06.786 | WARNING  | yamain.command.build:compile_npu_subgraph:1035 - graph [subgraph_npu_0] batchs [1, 2]
2023-07-09 20:06:06.795 | INFO     | yamain.command.build:compile_ptq_model:924 - fuse 1 subgraph(s)
9.4.3. 包含 Reshape 算子的模型多 batch 编译#
如果模型中包含 Reshape 算子,在执行多 batch 编译时 pulsar2 可能无法正确的推测出 Reshape 算子的输出 shape。
此时用户可以通过 《常量数据修改》 功能,修改 Reshape 算子的 shape 输入数据,使得 pulsar2 在多 batch 编译过程中正确推导出输出 shape。
比如存在一个 shape 为 [2, 1, 64] 的 Reshape 算子,假设第 1 维为 batch,则通过常量数据修改功能,将 shape 对应的常量 tensor 修改为 [2, -1, 64] 或者 [2, 0, 64] 后,即可支持多 batch 编译。
除此之外,如果用户没有显式的配置算子属性修改,那么 pulsar2 会将 Reshape 算子 shape 的第 0 维修改为 -1,尝试进行多 batch 编译。
提示
pulsar2 支持在 Reshape 的 shape 中配置 0 或者 -1。0 代表与输入 tensor 对应维度的值相同;-1 代表根据输入 tensor 计算得出的未知维度大小。
9.5. 逐层对分详解#
pulsar2 build 提供了一套浮点模型与量化后模型的逐层精度对比工具。有如下两种方式配置,任选其一即可:
在命令行中配置
--quant.precision_analysis 1开启精度对比功能;如下为一个示例:
root@xxx:/data/quick_start_example# pulsar2 build --input model/mobilenetv2-sim.onnx --output_dir output --config config/mobilenet_v2_build_config.json --quant.precision_analysis 1
编译命令不变,在配置文件中将
"precision_analysis": false修改为"precision_analysis": true:
{
  "model_type": "ONNX",
  "npu_mode": "NPU1",
  "quant": {
    "input_configs": [
      {
        "tensor_name": "input",
        "calibration_dataset": "./dataset/imagenet-32-images.tar",
        "calibration_size": 32,
        "calibration_mean": [103.939, 116.779, 123.68],
        "calibration_std": [58.0, 58.0, 58.0]
      }
    ],
    "calibration_method": "MinMax",
    "precision_analysis": true  # 这里修改为 true, 默认是 false
  },
  "input_processors": [
    {
      "tensor_name": "input",
      "tensor_format": "BGR",
      "src_format": "BGR",
      "src_dtype": "U8",
      "src_layout": "NHWC",
      "csc_mode": "NoCSC"
    }
  ],
  "compiler": {
    "check": 0
  }
}
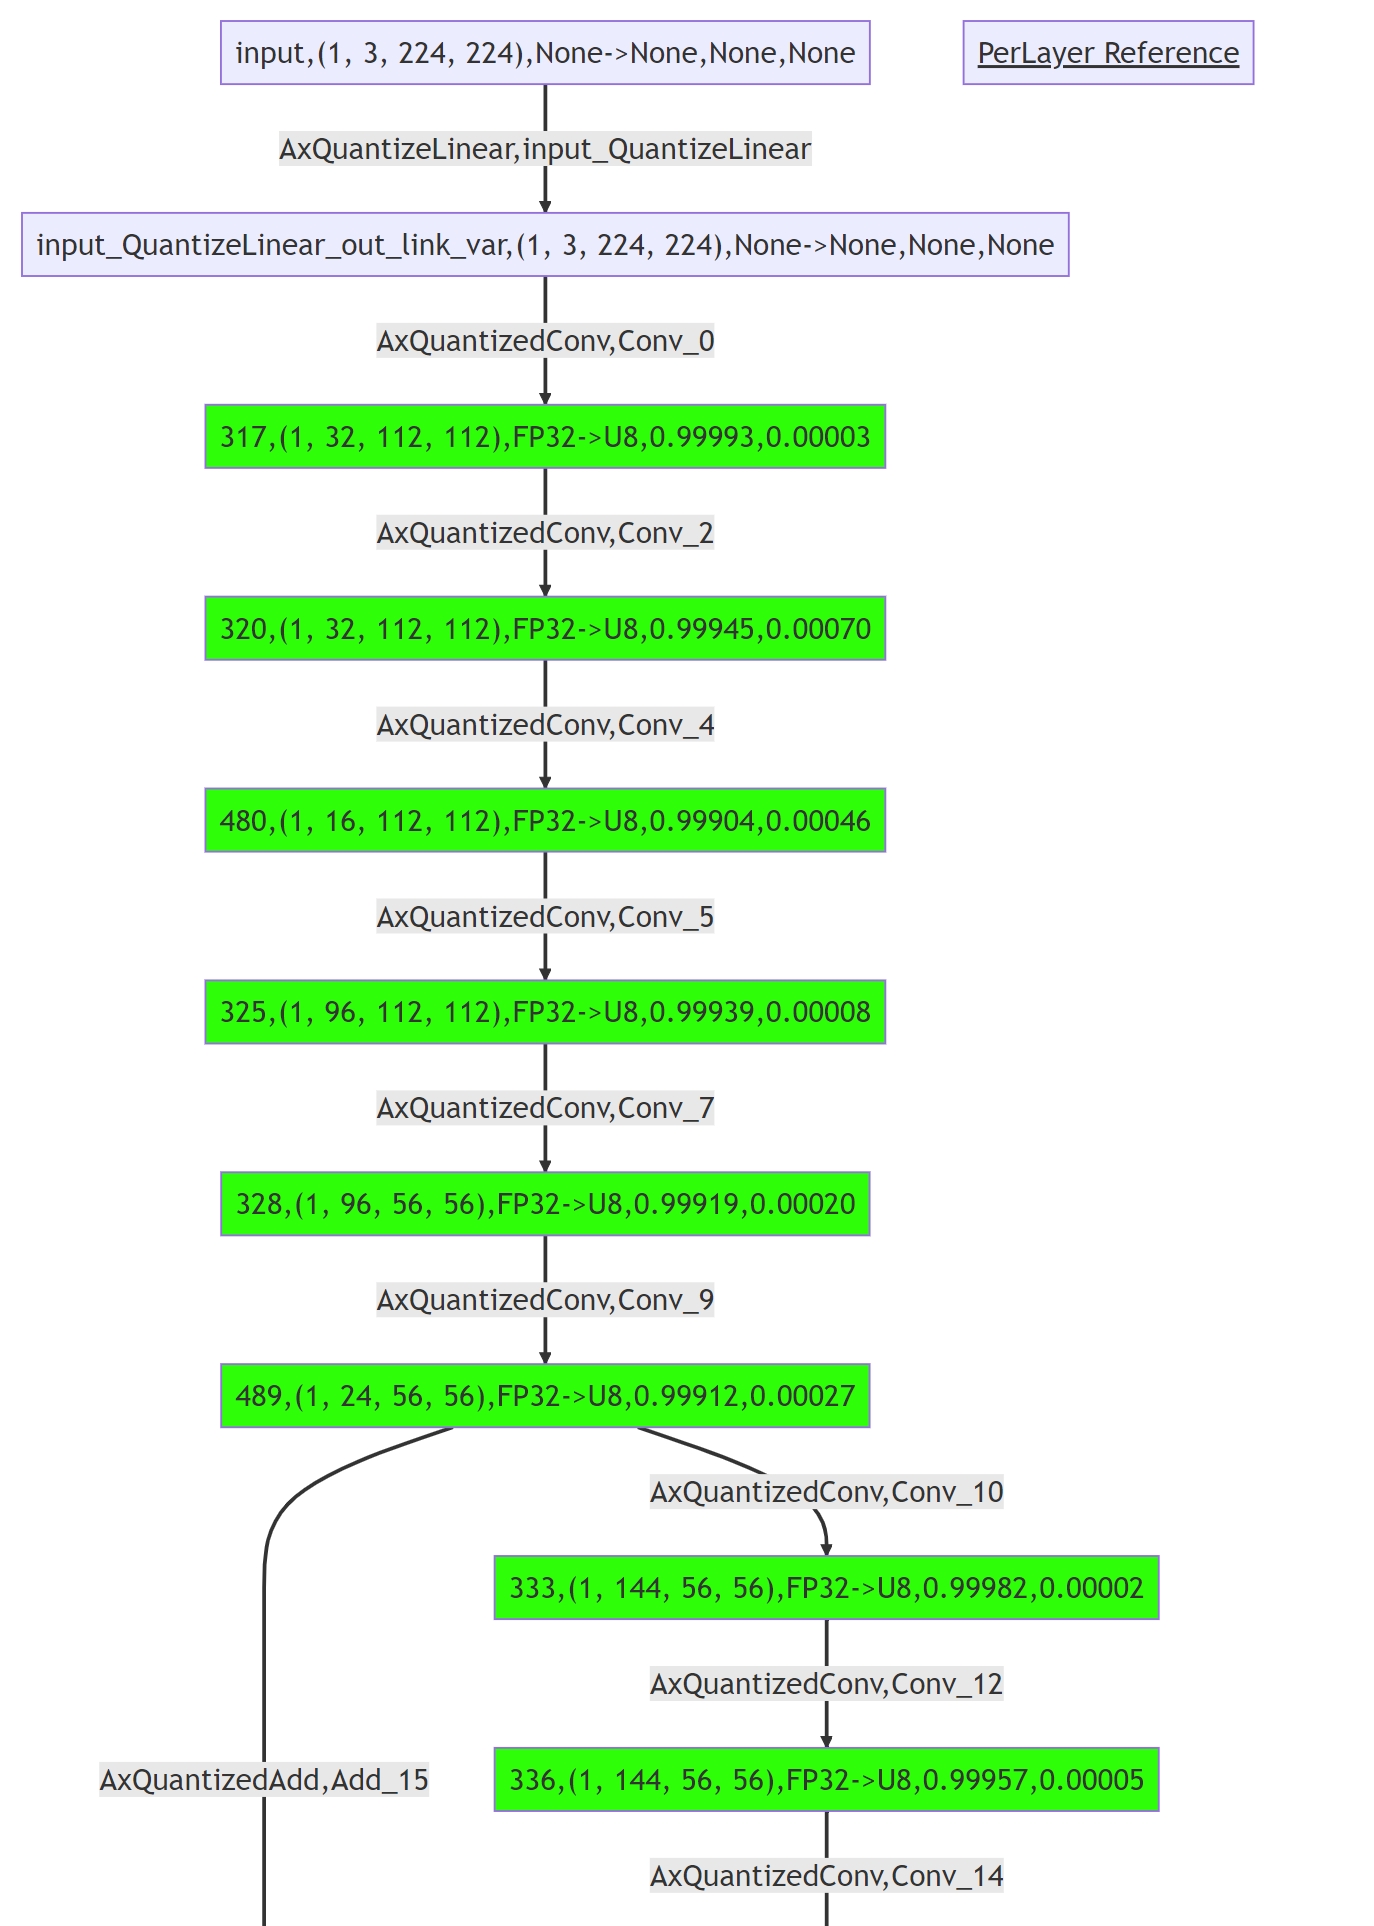
重新执行编译过程后,可得到如下带有 Quant Precision Table 的输出信息,包含了 节点名、类型、输出名、数据类型、输出形状、余弦相似度、均方误差 等:
同时会保存一个 mmd 格式的量化相似度图文件,通过颜色区分不同相似度,可以更直观的定位精度问题,可以通过日志中的 save precision analysis graph to 关键字找到文件路径。
root@xxx:/data# pulsar2 build --input model/mobilenetv2-sim.onnx --output_dir output --config config/mobilenet_v2_build_config.json
...

Building native ━━━━━━━━━━━━━━━━━━━━━━━━━━━━━━━━━━━━━━━━ 100% 0:00:00
                                             Quant Precision Table【PerLayer Reference】
┏━━━━━━━━━━━━━━━━━━━━━━━━━┳━━━━━━━━━━━━━━━━━━━━━━━━┳━━━━━━━━━━━━━━━┳━━━━━━━━━━━━━━━━━━━┳━━━━━━━┳━━━━━━━━┳━━━━━━━━━┳━━━━━━━━━┓
┃ Operator                ┃          Type          ┃ Output Tensor ┃       Shape       ┃ DType ┃ QDType ┃ Cosin   ┃ MSE     ┃
┡━━━━━━━━━━━━━━━━━━━━━━━━━╇━━━━━━━━━━━━━━━━━━━━━━━━╇━━━━━━━━━━━━━━━╇━━━━━━━━━━━━━━━━━━━╇━━━━━━━╇━━━━━━━━╇━━━━━━━━━╇━━━━━━━━━┩
│ Conv_0                  │    AxQuantizedConv     │ 317           │ (1, 32, 112, 112) │ FP32  │   U8   │ 0.99993 │ 0.00003 │
├─────────────────────────┼────────────────────────┼───────────────┼───────────────────┼───────┼────────┼─────────┼─────────┤
│ Conv_2                  │    AxQuantizedConv     │ 320           │ (1, 32, 112, 112) │ FP32  │   U8   │ 0.99945 │ 0.00070 │
├─────────────────────────┼────────────────────────┼───────────────┼───────────────────┼───────┼────────┼─────────┼─────────┤
│ Conv_4                  │    AxQuantizedConv     │ 480           │ (1, 16, 112, 112) │ FP32  │   U8   │ 0.99904 │ 0.00046 │
├─────────────────────────┼────────────────────────┼───────────────┼───────────────────┼───────┼────────┼─────────┼─────────┤
│ Conv_5                  │    AxQuantizedConv     │ 325           │ (1, 96, 112, 112) │ FP32  │   U8   │ 0.99939 │ 0.00008 │
├─────────────────────────┼────────────────────────┼───────────────┼───────────────────┼───────┼────────┼─────────┼─────────┤
│ Conv_7                  │    AxQuantizedConv     │ 328           │  (1, 96, 56, 56)  │ FP32  │   U8   │ 0.99919 │ 0.00020 │
├─────────────────────────┼────────────────────────┼───────────────┼───────────────────┼───────┼────────┼─────────┼─────────┤
│ Conv_9                  │    AxQuantizedConv     │ 489           │  (1, 24, 56, 56)  │ FP32  │   U8   │ 0.99912 │ 0.00027 │
├─────────────────────────┼────────────────────────┼───────────────┼───────────────────┼───────┼────────┼─────────┼─────────┤
│ Conv_10                 │    AxQuantizedConv     │ 333           │ (1, 144, 56, 56)  │ FP32  │   U8   │ 0.99982 │ 0.00002 │
├─────────────────────────┼────────────────────────┼───────────────┼───────────────────┼───────┼────────┼─────────┼─────────┤
│ Conv_12                 │    AxQuantizedConv     │ 336           │ (1, 144, 56, 56)  │ FP32  │   U8   │ 0.99957 │ 0.00005 │
├─────────────────────────┼────────────────────────┼───────────────┼───────────────────┼───────┼────────┼─────────┼─────────┤
│ Conv_14                 │    AxQuantizedConv     │ 498           │  (1, 24, 56, 56)  │ FP32  │   U8   │ 0.99933 │ 0.00026 │
├─────────────────────────┼────────────────────────┼───────────────┼───────────────────┼───────┼────────┼─────────┼─────────┤
│ Add_15                  │     AxQuantizedAdd     │ 339           │  (1, 24, 56, 56)  │ FP32  │   U8   │ 0.99930 │ 0.00050 │
├─────────────────────────┼────────────────────────┼───────────────┼───────────────────┼───────┼────────┼─────────┼─────────┤
│ Conv_16                 │    AxQuantizedConv     │ 342           │ (1, 144, 56, 56)  │ FP32  │   U8   │ 0.99969 │ 0.00002 │
├─────────────────────────┼────────────────────────┼───────────────┼───────────────────┼───────┼────────┼─────────┼─────────┤
│ Conv_18                 │    AxQuantizedConv     │ 345           │ (1, 144, 28, 28)  │ FP32  │   U8   │ 0.99979 │ 0.00004 │
├─────────────────────────┼────────────────────────┼───────────────┼───────────────────┼───────┼────────┼─────────┼─────────┤
│ Conv_20                 │    AxQuantizedConv     │ 507           │  (1, 32, 28, 28)  │ FP32  │   U8   │ 0.99970 │ 0.00013 │
├─────────────────────────┼────────────────────────┼───────────────┼───────────────────┼───────┼────────┼─────────┼─────────┤
│ Conv_21                 │    AxQuantizedConv     │ 350           │ (1, 192, 28, 28)  │ FP32  │   U8   │ 0.99989 │ 0.00001 │
├─────────────────────────┼────────────────────────┼───────────────┼───────────────────┼───────┼────────┼─────────┼─────────┤
│ Conv_23                 │    AxQuantizedConv     │ 353           │ (1, 192, 28, 28)  │ FP32  │   U8   │ 0.99936 │ 0.00003 │
├─────────────────────────┼────────────────────────┼───────────────┼───────────────────┼───────┼────────┼─────────┼─────────┤
│ Conv_25                 │    AxQuantizedConv     │ 516           │  (1, 32, 28, 28)  │ FP32  │   U8   │ 0.99955 │ 0.00008 │
├─────────────────────────┼────────────────────────┼───────────────┼───────────────────┼───────┼────────┼─────────┼─────────┤
│ Add_26                  │     AxQuantizedAdd     │ 356           │  (1, 32, 28, 28)  │ FP32  │   U8   │ 0.99969 │ 0.00020 │
├─────────────────────────┼────────────────────────┼───────────────┼───────────────────┼───────┼────────┼─────────┼─────────┤
│ Conv_27                 │    AxQuantizedConv     │ 359           │ (1, 192, 28, 28)  │ FP32  │   U8   │ 0.99989 │ 0.00000 │
├─────────────────────────┼────────────────────────┼───────────────┼───────────────────┼───────┼────────┼─────────┼─────────┤
│ Conv_29                 │    AxQuantizedConv     │ 362           │ (1, 192, 28, 28)  │ FP32  │   U8   │ 0.99974 │ 0.00001 │
├─────────────────────────┼────────────────────────┼───────────────┼───────────────────┼───────┼────────┼─────────┼─────────┤
│ Conv_31                 │    AxQuantizedConv     │ 525           │  (1, 32, 28, 28)  │ FP32  │   U8   │ 0.99950 │ 0.00006 │
├─────────────────────────┼────────────────────────┼───────────────┼───────────────────┼───────┼────────┼─────────┼─────────┤
│ Add_32                  │     AxQuantizedAdd     │ 365           │  (1, 32, 28, 28)  │ FP32  │   U8   │ 0.99966 │ 0.00026 │
├─────────────────────────┼────────────────────────┼───────────────┼───────────────────┼───────┼────────┼─────────┼─────────┤
│ Conv_33                 │    AxQuantizedConv     │ 368           │ (1, 192, 28, 28)  │ FP32  │   U8   │ 0.99984 │ 0.00001 │
├─────────────────────────┼────────────────────────┼───────────────┼───────────────────┼───────┼────────┼─────────┼─────────┤
│ Conv_35                 │    AxQuantizedConv     │ 371           │ (1, 192, 14, 14)  │ FP32  │   U8   │ 0.99991 │ 0.00002 │
├─────────────────────────┼────────────────────────┼───────────────┼───────────────────┼───────┼────────┼─────────┼─────────┤
│ Conv_37                 │    AxQuantizedConv     │ 534           │  (1, 64, 14, 14)  │ FP32  │   U8   │ 0.99968 │ 0.00012 │
├─────────────────────────┼────────────────────────┼───────────────┼───────────────────┼───────┼────────┼─────────┼─────────┤
│ Conv_38                 │    AxQuantizedConv     │ 376           │ (1, 384, 14, 14)  │ FP32  │   U8   │ 0.99994 │ 0.00000 │
├─────────────────────────┼────────────────────────┼───────────────┼───────────────────┼───────┼────────┼─────────┼─────────┤
│ Conv_40                 │    AxQuantizedConv     │ 379           │ (1, 384, 14, 14)  │ FP32  │   U8   │ 0.99975 │ 0.00001 │
├─────────────────────────┼────────────────────────┼───────────────┼───────────────────┼───────┼────────┼─────────┼─────────┤
│ Conv_42                 │    AxQuantizedConv     │ 543           │  (1, 64, 14, 14)  │ FP32  │   U8   │ 0.99979 │ 0.00004 │
├─────────────────────────┼────────────────────────┼───────────────┼───────────────────┼───────┼────────┼─────────┼─────────┤
│ Add_43                  │     AxQuantizedAdd     │ 382           │  (1, 64, 14, 14)  │ FP32  │   U8   │ 0.99976 │ 0.00011 │
├─────────────────────────┼────────────────────────┼───────────────┼───────────────────┼───────┼────────┼─────────┼─────────┤
│ Conv_44                 │    AxQuantizedConv     │ 385           │ (1, 384, 14, 14)  │ FP32  │   U8   │ 0.99994 │ 0.00000 │
├─────────────────────────┼────────────────────────┼───────────────┼───────────────────┼───────┼────────┼─────────┼─────────┤
│ Conv_46                 │    AxQuantizedConv     │ 388           │ (1, 384, 14, 14)  │ FP32  │   U8   │ 0.99985 │ 0.00001 │
├─────────────────────────┼────────────────────────┼───────────────┼───────────────────┼───────┼────────┼─────────┼─────────┤
│ Conv_48                 │    AxQuantizedConv     │ 552           │  (1, 64, 14, 14)  │ FP32  │   U8   │ 0.99973 │ 0.00003 │
├─────────────────────────┼────────────────────────┼───────────────┼───────────────────┼───────┼────────┼─────────┼─────────┤
│ Add_49                  │     AxQuantizedAdd     │ 391           │  (1, 64, 14, 14)  │ FP32  │   U8   │ 0.99973 │ 0.00013 │
├─────────────────────────┼────────────────────────┼───────────────┼───────────────────┼───────┼────────┼─────────┼─────────┤
│ Conv_50                 │    AxQuantizedConv     │ 394           │ (1, 384, 14, 14)  │ FP32  │   U8   │ 0.99989 │ 0.00000 │
├─────────────────────────┼────────────────────────┼───────────────┼───────────────────┼───────┼────────┼─────────┼─────────┤
│ Conv_52                 │    AxQuantizedConv     │ 397           │ (1, 384, 14, 14)  │ FP32  │   U8   │ 0.99954 │ 0.00002 │
├─────────────────────────┼────────────────────────┼───────────────┼───────────────────┼───────┼────────┼─────────┼─────────┤
│ Conv_54                 │    AxQuantizedConv     │ 561           │  (1, 64, 14, 14)  │ FP32  │   U8   │ 0.99893 │ 0.00016 │
├─────────────────────────┼────────────────────────┼───────────────┼───────────────────┼───────┼────────┼─────────┼─────────┤
│ Add_55                  │     AxQuantizedAdd     │ 400           │  (1, 64, 14, 14)  │ FP32  │   U8   │ 0.99954 │ 0.00024 │
├─────────────────────────┼────────────────────────┼───────────────┼───────────────────┼───────┼────────┼─────────┼─────────┤
│ Conv_56                 │    AxQuantizedConv     │ 403           │ (1, 384, 14, 14)  │ FP32  │   U8   │ 0.99987 │ 0.00000 │
├─────────────────────────┼────────────────────────┼───────────────┼───────────────────┼───────┼────────┼─────────┼─────────┤
│ Conv_58                 │    AxQuantizedConv     │ 406           │ (1, 384, 14, 14)  │ FP32  │   U8   │ 0.99984 │ 0.00002 │
├─────────────────────────┼────────────────────────┼───────────────┼───────────────────┼───────┼────────┼─────────┼─────────┤
│ Conv_60                 │    AxQuantizedConv     │ 570           │  (1, 96, 14, 14)  │ FP32  │   U8   │ 0.99963 │ 0.00007 │
├─────────────────────────┼────────────────────────┼───────────────┼───────────────────┼───────┼────────┼─────────┼─────────┤
│ Conv_61                 │    AxQuantizedConv     │ 411           │ (1, 576, 14, 14)  │ FP32  │   U8   │ 0.99982 │ 0.00000 │
├─────────────────────────┼────────────────────────┼───────────────┼───────────────────┼───────┼────────┼─────────┼─────────┤
│ Conv_63                 │    AxQuantizedConv     │ 414           │ (1, 576, 14, 14)  │ FP32  │   U8   │ 0.99934 │ 0.00003 │
├─────────────────────────┼────────────────────────┼───────────────┼───────────────────┼───────┼────────┼─────────┼─────────┤
│ Conv_65                 │    AxQuantizedConv     │ 579           │  (1, 96, 14, 14)  │ FP32  │   U8   │ 0.99818 │ 0.00018 │
├─────────────────────────┼────────────────────────┼───────────────┼───────────────────┼───────┼────────┼─────────┼─────────┤
│ Add_66                  │     AxQuantizedAdd     │ 417           │  (1, 96, 14, 14)  │ FP32  │   U8   │ 0.99941 │ 0.00016 │
├─────────────────────────┼────────────────────────┼───────────────┼───────────────────┼───────┼────────┼─────────┼─────────┤
│ Conv_67                 │    AxQuantizedConv     │ 420           │ (1, 576, 14, 14)  │ FP32  │   U8   │ 0.99895 │ 0.00002 │
├─────────────────────────┼────────────────────────┼───────────────┼───────────────────┼───────┼────────┼─────────┼─────────┤
│ Conv_69                 │    AxQuantizedConv     │ 423           │ (1, 576, 14, 14)  │ FP32  │   U8   │ 0.99857 │ 0.00006 │
├─────────────────────────┼────────────────────────┼───────────────┼───────────────────┼───────┼────────┼─────────┼─────────┤
│ Conv_71                 │    AxQuantizedConv     │ 588           │  (1, 96, 14, 14)  │ FP32  │   U8   │ 0.99615 │ 0.00052 │
├─────────────────────────┼────────────────────────┼───────────────┼───────────────────┼───────┼────────┼─────────┼─────────┤
│ Add_72                  │     AxQuantizedAdd     │ 426           │  (1, 96, 14, 14)  │ FP32  │   U8   │ 0.99804 │ 0.00078 │
├─────────────────────────┼────────────────────────┼───────────────┼───────────────────┼───────┼────────┼─────────┼─────────┤
│ Conv_73                 │    AxQuantizedConv     │ 429           │ (1, 576, 14, 14)  │ FP32  │   U8   │ 0.99914 │ 0.00002 │
├─────────────────────────┼────────────────────────┼───────────────┼───────────────────┼───────┼────────┼─────────┼─────────┤
│ Conv_75                 │    AxQuantizedConv     │ 432           │  (1, 576, 7, 7)   │ FP32  │   U8   │ 0.99953 │ 0.00005 │
├─────────────────────────┼────────────────────────┼───────────────┼───────────────────┼───────┼────────┼─────────┼─────────┤
│ Conv_77                 │    AxQuantizedConv     │ 597           │  (1, 160, 7, 7)   │ FP32  │   U8   │ 0.99265 │ 0.00047 │
├─────────────────────────┼────────────────────────┼───────────────┼───────────────────┼───────┼────────┼─────────┼─────────┤
│ Conv_78                 │    AxQuantizedConv     │ 437           │  (1, 960, 7, 7)   │ FP32  │   U8   │ 0.99659 │ 0.00008 │
├─────────────────────────┼────────────────────────┼───────────────┼───────────────────┼───────┼────────┼─────────┼─────────┤
│ Conv_80                 │    AxQuantizedConv     │ 440           │  (1, 960, 7, 7)   │ FP32  │   U8   │ 0.99807 │ 0.00007 │
├─────────────────────────┼────────────────────────┼───────────────┼───────────────────┼───────┼────────┼─────────┼─────────┤
│ Conv_82                 │    AxQuantizedConv     │ 606           │  (1, 160, 7, 7)   │ FP32  │   U8   │ 0.99201 │ 0.00042 │
├─────────────────────────┼────────────────────────┼───────────────┼───────────────────┼───────┼────────┼─────────┼─────────┤
│ Add_83                  │     AxQuantizedAdd     │ 443           │  (1, 160, 7, 7)   │ FP32  │   U8   │ 0.98304 │ 0.00211 │
├─────────────────────────┼────────────────────────┼───────────────┼───────────────────┼───────┼────────┼─────────┼─────────┤
│ Conv_84                 │    AxQuantizedConv     │ 446           │  (1, 960, 7, 7)   │ FP32  │   U8   │ 0.99485 │ 0.00011 │
├─────────────────────────┼────────────────────────┼───────────────┼───────────────────┼───────┼────────┼─────────┼─────────┤
│ Conv_86                 │    AxQuantizedConv     │ 449           │  (1, 960, 7, 7)   │ FP32  │   U8   │ 0.99866 │ 0.00007 │
├─────────────────────────┼────────────────────────┼───────────────┼───────────────────┼───────┼────────┼─────────┼─────────┤
│ Conv_88                 │    AxQuantizedConv     │ 615           │  (1, 160, 7, 7)   │ FP32  │   U8   │ 0.98717 │ 0.00190 │
├─────────────────────────┼────────────────────────┼───────────────┼───────────────────┼───────┼────────┼─────────┼─────────┤
│ Add_89                  │     AxQuantizedAdd     │ 452           │  (1, 160, 7, 7)   │ FP32  │   U8   │ 0.97100 │ 0.00809 │
├─────────────────────────┼────────────────────────┼───────────────┼───────────────────┼───────┼────────┼─────────┼─────────┤
│ Conv_90                 │    AxQuantizedConv     │ 455           │  (1, 960, 7, 7)   │ FP32  │   U8   │ 0.98869 │ 0.00006 │
├─────────────────────────┼────────────────────────┼───────────────┼───────────────────┼───────┼────────┼─────────┼─────────┤
│ Conv_92                 │    AxQuantizedConv     │ 458           │  (1, 960, 7, 7)   │ FP32  │   U8   │ 0.99952 │ 0.00002 │
├─────────────────────────┼────────────────────────┼───────────────┼───────────────────┼───────┼────────┼─────────┼─────────┤
│ Conv_94                 │    AxQuantizedConv     │ 624           │  (1, 320, 7, 7)   │ FP32  │   U8   │ 0.99873 │ 0.00012 │
├─────────────────────────┼────────────────────────┼───────────────┼───────────────────┼───────┼────────┼─────────┼─────────┤
│ Conv_95                 │    AxQuantizedConv     │ 463           │  (1, 1280, 7, 7)  │ FP32  │   U8   │ 0.99990 │ 0.00024 │
├─────────────────────────┼────────────────────────┼───────────────┼───────────────────┼───────┼────────┼─────────┼─────────┤
│ GlobalAveragePool_97    │ AxQuantizedGlobAvgPool │ 464           │  (1, 1280, 1, 1)  │ FP32  │   U8   │ 0.99998 │ 0.00002 │
├─────────────────────────┼────────────────────────┼───────────────┼───────────────────┼───────┼────────┼─────────┼─────────┤
│ Reshape_103             │       AxReshape        │ 472           │     (1, 1280)     │ FP32  │   U8   │ 0.99998 │ 0.00002 │
├─────────────────────────┼────────────────────────┼───────────────┼───────────────────┼───────┼────────┼─────────┼─────────┤
│ output_DequantizeLinear │   AxDequantizeLinear   │ output        │     (1, 1000)     │ FP32  │  FP32  │ 0.99990 │ 0.00173 │
└─────────────────────────┴────────────────────────┴───────────────┴───────────────────┴───────┴────────┴─────────┴─────────┘
2024-09-25 11:47:01.640 | INFO     | yamain.command.precision_analysis:quant_precision_analysis:401 - save precision analysis table to [output/quant/debug/precision_analysis_table.txt]
2024-09-25 11:47:01.641 | INFO     | yamain.command.precision_analysis:quant_precision_analysis:409 - save precision analysis graph to [output/quant/debug/precision_analysis.mmd]
...
通过支持 mermaid flowchart 的编辑工具打开 output/quant/debug/precision_analysis.mmd 文件可以看到以下量化相似度图
提示
更加详细的内容,请参考 《量化精度分析参数说明》.
备注
如果配置文件中 "precision_analysis": false,编译命令包含 --quant.precision_analysis 1,此时依然会开启精度对比功能。
9.6. 加载自定义数据集详解#
一般情况下,模型输入是 RGB 色彩空间,默认或者设置 calibration_format 为 Image , 在量化校准过程加载数据时会先对校准集中的图片做归一化和缩放。
而如果是非 RGB 色彩空间的输入, 此时工具链难以感知到需要做哪些预处理, pulsar2 build 也支持加载用户自定义的数据集用于量化,支持 .npy 以及 .bin 为后缀名的文件格式。
calibration_format 一共支持 Image Numpy Binary NumpyObject 四种格式。
备注
在使用 Numpy Binary NumpyObject 的量化数据格式时,工具链会直接加载数据进行量化,不再做预处理。需要用户自行完成数据的预处理,保证校准集中的数据可以直接输入到模型中进行推理并得到正确结果。
9.6.1. 准备数据集#
在使用自定义数据集时,建议准备校准数据集的流程如下:
对数据做预处理
预处理流程应与推理时的处理流程保持严格一致
必须确保校准数据的数据类型和形状与模型输入完全一致
将校准数据保存成
.npy或者.bin格式并压缩。
备注
npy 后缀名文件指以 Numpy 数组格式保存的文件,后缀名为 .npy 。
bin 后缀名文件指以二进制格式保存的文件,使用该文件格式时,数据应以二进制保存,后缀名为 .bin 。
9.6.2. 配置与编译#
修改 quant.input_configs.calibration_format 字段为 Numpy 或者 Binary , 一个完整的示例如下:
{
  "model_type": "ONNX",
  "npu_mode": "NPU1",
  "quant": {
    "input_configs": [
      {
        "tensor_name": "input",
        "calibration_dataset": "./dataset/npy_dataset.tar",
        "calibration_size": 10,
        "calibration_format": "Numpy", # 修改为 Numpy 或者 Binary, 默认是Image
      }
    ],
    "calibration_method": "MinMax",
  },
  "input_processors": [
    {
      "tensor_name": "input",
      "tensor_format": "BGR",
      "src_format": "BGR",
      "src_dtype": "U8",
      "src_layout": "NHWC",
      "csc_mode": "NoCSC"
    }
  ],
  "compiler": {
    "check": 0
  }
}
执行编译,Quant Config Table 中的 Data Format 字段变更为了 Numpy,结果参考如下:
root@aa:/data/quick_start_example# pulsar2 build --input model/mobilenetv2-sim.onnx --output_dir npy_output/ --config config/npy_config_mobilenet_v2_onnx.json
...
                                                                        Quant Config Table
┏━━━━━━━┳━━━━━━━━━━━━━━━━━━┳━━━━━━━━━━━━━━━━━━━┳━━━━━━━━━━━━━┳━━━━━━━━━━━━━━━┳━━━━━━━━━━━━━━━━━━━━━━━━━━━━━━━━━━━━━━━━━━━━━━━━━━━━━━━━━━━━━━┳━━━━━━━━━━━━━━━━━━━━┓
┃ Input ┃ Shape            ┃ Dataset Directory ┃ Data Format ┃ Tensor Format ┃ Mean                                                         ┃ Std                ┃
┡━━━━━━━╇━━━━━━━━━━━━━━━━━━╇━━━━━━━━━━━━━━━━━━━╇━━━━━━━━━━━━━╇━━━━━━━━━━━━━━━╇━━━━━━━━━━━━━━━━━━━━━━━━━━━━━━━━━━━━━━━━━━━━━━━━━━━━━━━━━━━━━━╇━━━━━━━━━━━━━━━━━━━━┩
│ input │ [1, 3, 224, 224] │ input             │ Numpy       │ BGR           │ [103.93900299072266, 116.77899932861328, 123.68000030517578] │ [58.0, 58.0, 58.0] │
└───────┴──────────────────┴───────────────────┴─────────────┴───────────────┴──────────────────────────────────────────────────────────────┴────────────────────┘
...
9.7. 多输入模型配置量化数据集#
多输入的模型,不同输入需要不同的校准集,可以通过修改配置实现。
字段 input_configs 支持配置多个输入, 通过 tensor_name 指定模型的输入名,以下为一个配置示例:
{
  "quant": {
    "input_configs": [
      {
        "tensor_name": "input1", # 输入 1
        "calibration_dataset": "input1_dataset.tar",
        "calibration_size": 10,
        "calibration_mean": [103.939, 116.779, 123.68],
        "calibration_std": [58.0, 58.0, 58.0],
        "calibration_format": "Image", #
      },
      {
        "tensor_name": "input2", # 输入 2
        "calibration_dataset": "input2_dataset.tar",
        "calibration_size": 10,
        "calibration_mean": [103.939, 116.779, 123.68],
        "calibration_std": [58.0, 58.0, 58.0],
        "calibration_format": "Image",
      },
    ],
  }
}
多输入模型可能存在每个 batch 不同输入需要匹配的情况,这时可以通过将不同输入的校准集相同 batch 改成同样的名字,量化时会选取相同名字的输入做为一个 batch 去量化。
以上面的配置文件为例,下面是对应的量化文件的目录结构示例:
.
├── input1
│   ├── 1.bin
│   └── 2.bin
└── input2
    ├── 1.bin
    └── 2.bin
在量化模块进行较准数据时,则会取 input1 的 1.bin 和 input2 的 1.bin 做为第一个 batch 。
9.8. 多输入模型配置量化数据集(NumpyObject)#
多输入的模型,不同输入需要不同的校准集,也可以通过使用 NumpyObject 实现,
字段 input_configs 支持配置多个输入, 通过 tensor_name 指定模型的输入名,以下为一个配置示例:
{
  "quant": {
    "input_configs": [
      {
        "tensor_name": "DEFAULT",
        "calibration_dataset": "dataset.tar",
        "calibration_size": -1,
        "calibration_format": "NumpyObject", # 数据类型
      },

    ],
  }
}
9.8.1. 准备数据集#
NumpyObject 是 Numpy 提供的一种字典数据类型。 字典数据与模型中 input 对应,其中 key 为模型的 input 名。
value 为较准数据,类型和形状要与相应的 input 相同,即做完预处理后直接输入到模型的数据, 格式为 numpy.ndarray 。
value 的数据处理与 《加载自定义数据集详解》 相同。
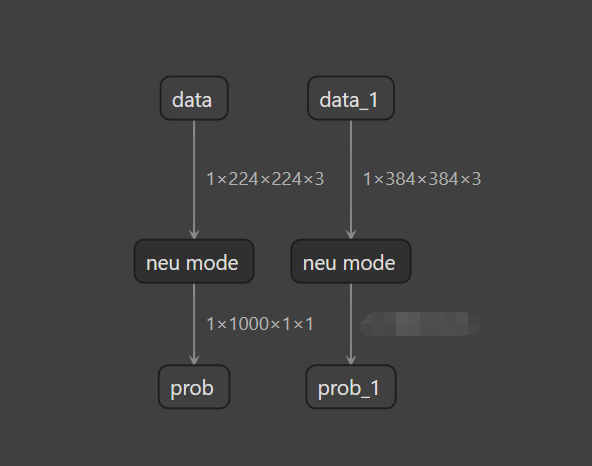
假设模型有两个输入如下图:

下面是一个最简单的生成示例代码:
import numpy as np

calib_data = {}
calib_data["rgb"] = np.random.randn(1, 2, 3, 224, 224).astype(np.float32)
calib_data["inst_emb"] = np.random.randn(1, 384).astype(np.float32)

np.save("data.npy", calib_data)
在生产环境中,建议调用推理代码的 dataloader , 对其进行遍历, 将遍历得到的数据转成 Numpy.ndarray 类型后按照字典保存为 NumpyObject , 就可以直接获取到做完预处理后的数据。
9.9. 混合精度量化详解#
pulsar2 build 支持混合精度量化,可以对指定 算子 或者 一类算子 或者 某个子图 设置量化精度。
9.9.1. 配置#
修改 quant.layer_configs 字段,目前量化精度支持的枚举: U8 , U16 , FP32。
以下为一个配置示例:
{
  "model_type": "ONNX",
  "npu_mode": "NPU1",
  "quant": {
    "input_configs": [
      {
        "tensor_name": "DEFAULT",
        "calibration_dataset": "./dataset/imagenet-32-images.tar",
        "calibration_size": 32,
        "calibration_mean": [103.939, 116.779, 123.68],
        "calibration_std": [58.0, 58.0, 58.0]
      }
    ],
    "layer_configs": [
        {
          "op_type": "Add", # 指定 Add 类型的算子的量化精度
          "data_type": "U16"
        },
        {
          "op_types": ["Sub"], # 指定多种类型算子的量化精度
          "data_type": "U16"
        },
        {
          "layer_name": "conv6_4", # 指定 conv6_4 算子的量化精度
          "data_type": "U16"
        },
        {
          "layer_names": ["conv4_3"], # 指定多个算子的量化精度
          "data_type": "U16"
        },
        {
          # 指定 conv2_1_linear_bn 与 relu2_2_dwise 之间子图内包含的算子量化精度
          "start_tensor_names": ["conv2_1_linear_bn"], # string of list
          "end_tensor_names": ["relu2_2_dwise"],       # string of list
          "data_type": "U16"
        }
    ],
    "calibration_method": "MinMax",
    "precision_analysis": false
  },
  "input_processors": [
    {
      "tensor_name": "input",
      "tensor_format": "BGR",
      "src_format": "BGR",
      "src_dtype": "U8",
      "src_layout": "NHWC",
      "csc_mode": "NoCSC"
    }
  ],
  "compiler": {
    "check": 0
  }
}
9.9.2. 子图配置说明#
配置 某个子图 为指定的类型时,需要注意 start_tensor_names 和 end_tensor_names 指定的是 tensor_name, 而非 node_name。
如果想配置整个模型为某个量化类型,可以将 start_tensor_names 和 end_tensor_names 设置成 [''DEFAULT''],下面是一个示例:
{
  "layer_configs": [
      {
          "start_tensor_names": ["DEFAULT"], # string of list
          "end_tensor_names": ["DEFAULT"],   # string of list
          "data_type": "U16"
      }
    ]
}
Conv 类型算子,不支持配置 data_type 为 FP32,但是可以单独配置其输出支持 FP32,通过如下配置实现:
{
  "layer_configs": [
      {
        "op_type": "Conv",
        "data_type": "U8",
        "output_data_type": "FP32", # 配置输出为FP32, 该配置目前只对Conv算子生效
      }
    ]
}
下面是配置整个模型除了 Conv 外其余算子为 FP32 量化类型的config:
{
  "layer_configs": [
      {
        "op_type": "Conv",
        "data_type": "U8",
        "output_data_type": "FP32", # 配置输出为FP32, 该配置目前只对Conv算子生效
      },
      {
          "start_tensor_names": ["DEFAULT"], # string of list
          "end_tensor_names": ["DEFAULT"],   # string of list
          "data_type": "FP32"
      }
    ]
}
备注
对于一个算子来说,可能同时存在 指定算子 或者 一类算子 或者 某个子图 三个量化精度配置,优先级为:
指定算子 > 一类算子 > 某个子图
注意
目前 FP32 配置支持的算子有限,已经验证过的算子有 LeayRelu Sigmoid Relu Add Mul Div
Sub Concat Softmax。
9.9.3. 编译与结果#
编译时会有 Layer Config Table 展示当前layer_configs的配置。
root@aa:/data/quick_start_example# pulsar2 build --input model/mobilenetv2-sim.onnx --output_dir output --config config/mobilenet_v2_mix_precision_config.json
...
                                                                        Quant Config Table
┏━━━━━━━┳━━━━━━━━━━━━━━━━━━┳━━━━━━━━━━━━━━━━━━━┳━━━━━━━━━━━━━┳━━━━━━━━━━━━━━━┳━━━━━━━━━━━━━━━━━━━━━━━━━━━━━━━━━━━━━━━━━━━━━━━━━━━━━━━━━━━━━━┳━━━━━━━━━━━━━━━━━━━━┓
┃ Input ┃ Shape            ┃ Dataset Directory ┃ Data Format ┃ Tensor Format ┃ Mean                                                         ┃ Std                ┃
┡━━━━━━━╇━━━━━━━━━━━━━━━━━━╇━━━━━━━━━━━━━━━━━━━╇━━━━━━━━━━━━━╇━━━━━━━━━━━━━━━╇━━━━━━━━━━━━━━━━━━━━━━━━━━━━━━━━━━━━━━━━━━━━━━━━━━━━━━━━━━━━━━╇━━━━━━━━━━━━━━━━━━━━┩
│ input │ [1, 3, 224, 224] │ input             │ Image       │ BGR           │ [103.93900299072266, 116.77899932861328, 123.68000030517578] │ [58.0, 58.0, 58.0] │
└───────┴──────────────────┴───────────────────┴─────────────┴───────────────┴──────────────────────────────────────────────────────────────┴────────────────────┘
        Layer Config Table
┏━━━━━━━━━━━━━━━━━━━━━━┳━━━━━━━━━━━┓
┃ Op Type / Layer name ┃ Precision ┃
┡━━━━━━━━━━━━━━━━━━━━━━╇━━━━━━━━━━━┩
│ Add                  │ U16       │
├──────────────────────┼───────────┤
│ conv6_4              │ U16       │
└──────────────────────┴───────────┘
...
编译结束后会在 output/quant 目录下生成一个 quant_axmodel.json 文件,里面记录了每个算子的量化配置信息,下面节选了其中一部分用作示例。
"Add_26": {
  "507": {
    "bit_width": 16,
    "policy": {
      "PER_TENSOR": true,
      "PER_CHANNEL": false,
      "LINEAR": true,
      "EXPONENTIAL": false,
      "SYMMETRICAL": false,
      "ASYMMETRICAL": true,
      "POWER_OF_2": false
    },
    "state": "ACTIVATED",
    "quant_min": 0,
    "quant_max": 65535,
    "hash": 762206185,
    "dominator": 762206185
  },
  "516": {
    "bit_width": 16,
    "policy": {
      "PER_TENSOR": true,
      "PER_CHANNEL": false,
      "LINEAR": true,
      "EXPONENTIAL": false,
      "SYMMETRICAL": false,
      "ASYMMETRICAL": true,
      "POWER_OF_2": false
    },
    "state": "OVERLAPPED",
    "quant_min": 0,
    "quant_max": 65535,
    "hash": 3471866632,
    "dominator": 4099361028
  }
}
9.10. 修改原始模型输入尺寸#
通过修改配置文件,可以在模型转换过程中修改各输入的尺寸。
接下来以 mobilenetv2 为基础,将模型输入修改为 384*384
命令行方式,增加参数:
--input_shapes data:1x3x384x384配置文件方式,在根节点增加参数:
{
   ...
   "input_shapes": "data:1x3x384x384",
   ...
}
转换模型过程中会出现以下日志,说明模型输入尺寸已修改成功:
INFO[0006] 2023-08-24 20:04:59.530 | WARNING | yamain.command.load_model:optimize_onnx_model:640 - change input shape to {'data': (1, 3, 384, 384)}
备注
模型输入尺寸修改作用在量化之前,量化数据集的尺寸需要与修改后的尺寸保持一致。
多组输入之间用半角分号分隔,详情参考参数详解部分。
9.11. 配置模型额外输入尺寸#
通过配置在模型编译过程中,除原始模型的主尺寸之外,可以输出额外其他若干组尺寸。这些尺寸都会保存在同一个 compiled.axmodel 中。
多组尺寸之间会复用同一组权重数据(量化工具将会在模型原始尺寸的基础上进行量化),用户需要自行评估量化时尺寸与推理时尺寸不同而可能导致的精度问题。
接下来将以 mobilenetv2 为例,在原输入尺寸 224*224 的基础上,额外增加一个尺寸 384*384,然后通过 pulsar2 run 工具选择尺寸进行仿真。
修改配置文件,在
input_processors节点中,对输入配置一个src_extra_shapes子节点:
{
  ...
  "input_processors": [
    {
      "tensor_name": "DEFAULT",
      "tensor_format": "BGR",
      "src_format": "BGR",
      "src_dtype": "U8",
      "src_layout": "NHWC",
      "src_extra_shapes": [
        {
          "shape": [1, 3, 384, 384]
        }
      ],
      "csc_mode": "NoCSC",
      "csc_mat": [
        1.164, 2.017, 0, -276.8, 1.164, -0.392, -0.813, 135.616, 1.164, 0,
        1.596, -221.912
      ]
    }
  ],
  ...
}
模型编译编译过程中,出现以下日志可以确认配置生效:
2024-01-01 21:27:02.082 | INFO | yamain.command.build:compile_ptq_model:973 - extra input shape, index: 1, shape: {'data': (1, 3, 384, 384)}
编译结束以后,
compiled.axmodel中将会包含两个独立尺寸的子图,可以单独进行推理。
pulsar2 run包含--group_index参数,用于选择不同尺寸的子图进行仿真,该参数默认值为 0,对应原始分辨率的子图(224*224)。1 对应额外分辨率的子图(384*384)。AXEngine推理包含额外输入尺寸的模型时选择不同尺寸的方式,请参考AXEngine 文档。
9.12. 算子属性修改#
通过修改配置文件,可以在模型转换过程中修改特定算子的属性。
接下来以 mobilenetv2 为基础,将其中名为 pool6 的 AveragePool 算子的 ceil_mode 修改为 1,在配置文件中增加以下内容:
"op_processors": [
  {
    "op_name": "pool6",
    "attrs": {
      "ceil_mode": 1
    }
  }
],
使用 pulsar2 build 转换模型会出现以下日志,说明算子属性已修改成功:
2023-05-07 18:47:34.274 | INFO | yamain.command.load_model:op_attr_patch:488 - set op [pool6] attr [ceil_mode] to 1
9.13. 常量数据修改#
通过修改配置文件,可以在模型转换过程中修改特定常量数据。
假设某个模型中包含一个名为 reshape_0 的 Reshape 算子,此算子的 shape 输入为名为 reshape_0_shape 的常量数据,原始数据为 [1, 96, 48]。
在配置文件中增加以下内容,可以将该常量数据修改为 [-1, 96, 48]。
"const_processors": [
  {
    "name": "reshape_0_shape",
    "data": [-1, 96, 48]
  }
],
使用 pulsar2 build 转换模型会出现以下日志,说明常量数据已修改成功:
2023-05-07 18:15:41.464 | WARNING | yamain.command.load_model:const_patch:512 - update data of const tensor [reshape_0_shape], (-1,, 96, 48), S64
9.14. 对子图设置单独的编译选项#
通过修改配置文件,可以在模型转换过程中对指定的子图设置单独的编译选项。
在配置文件的
compiler节点下,新增一个sub_configs节点,通过在sub_configs下配置start_tensor_names,end_tensor_names信息可以指定需要单独配置编译选项的子图范围。子图范围配置
start_tensor_names和end_tensor_names需要是工具链前端图优化之后的模型中的 tensor 名称,编译时设置--debug.dump_frontend_graph可以将前端优化后的模型保存在输出目录下frontend/optimzied_quant_axmodel.onnx,通过Netron等工具查看模型信息,确定子图的起止 tensor 名称。在
compiler节点下可配置的编译选项(除sub_configs外)均可以在子图编译选项中配置。子图编译选项没有显示配置的选项会继承
compiler节点下的配置。比如在compiler节点中将check配置为 1,而在子图编译选项中没有显式配置check的话,子图会继承compiler节点的配置,check的值为 1。配置了单独编译选项的子图,会在编译结果
compiled.axmodel中形成单独的一个子图。
接下来以 mobilenetv2 为基础,演示子图单独编译选项功能:
在原流程中添加编译选项
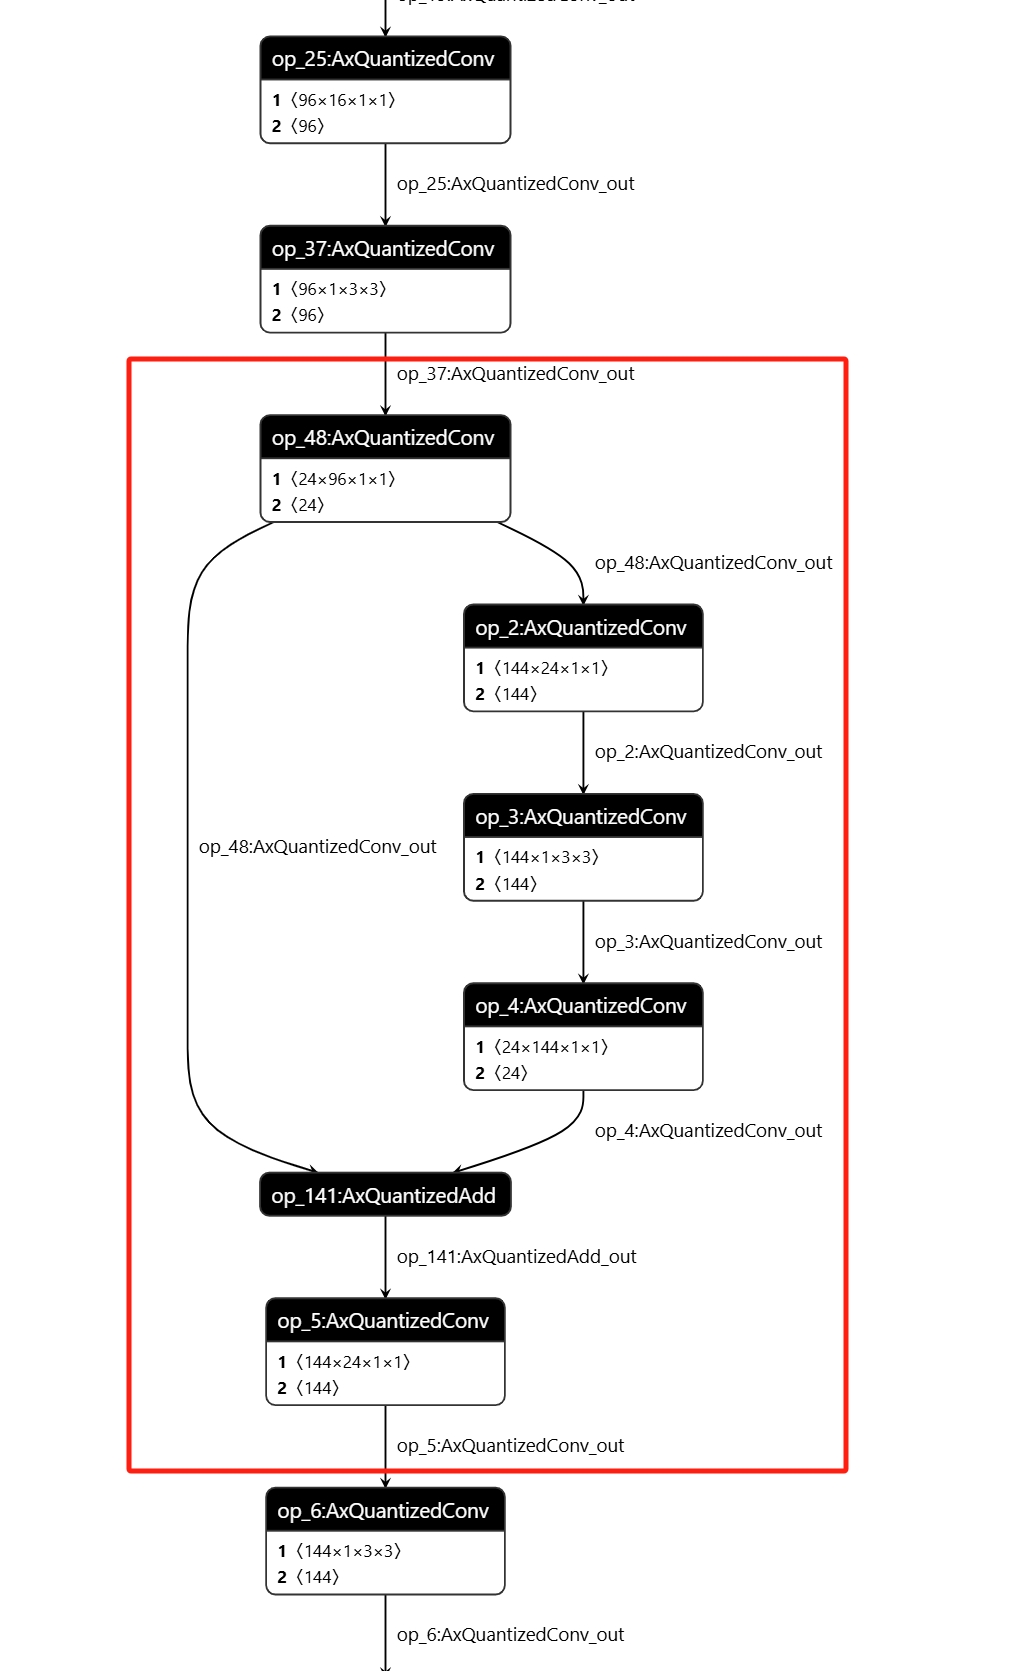
--debug.dump_frontend_graph重新执行 pulsar2 build,然后使用Netron工具打开输出目录下的frontend/optimzied_quant_axmodel.onnx文件。确认单独配置编译选项的子图范围,示例中子图起始 tensor 名
op_37:AxQuantizedConv_out,结束 tensor 名为op_5:AxQuantizedConv_out。
在配置文件中的
compiler节点下增加以下内容:
"sub_configs": [
  {
    "start_tensor_names": ["op_37:AxQuantizedConv_out"],
    "end_tensor_names": ["op_5:AxQuantizedConv_out"],
    "check": 2
  }
]
使用 pulsar2 build 转换模型会出现以下日志:
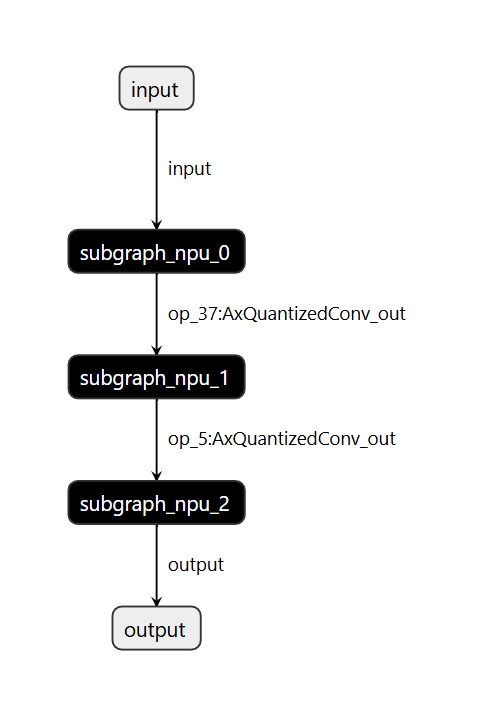
2024-12-10 14:38:30.487 | INFO     | yamain.command.build:compile_ptq_model:1139 - subgraph [0], group: 0, type: GraphType.NPU
2024-12-10 14:38:30.487 | INFO     | yamain.command.build:compile_ptq_model:1139 - subgraph [1], group: 0, type: GraphType.NPU
2024-12-10 14:38:30.487 | INFO     | yamain.command.build:compile_ptq_model:1139 - subgraph [2], group: 0, type: GraphType.NPU
说明因为子图配置编译选项,模型被分割为了 3 部分分别进行编译,并且在编译子图 1 时有如下日志:
2024-12-10 14:38:30.694 | INFO     | yamain.command.npu_backend_compiler:compile:157 - compile npu subgraph [1]
tiling op...   ━━━━━━━━━━━━━━━━━━━━━━━━━━━━━━━━━━━━━━━━━━━━━━━━━━━━━━━━━━━━━━━━━━━━━━━━━━━━━━━━━━━━━━━━━━━━━━━━━━━━━━━━━━━━━━━━━━━━━━━━━━━━━━━━━━━━━━━━━━━━━━━━━━━━━━━━━━━━━━━━━━━━━━━━━━━━━━━━━━━━━━━ 6/6 0:00:00
new_ddr_tensor = []
build op serially...   ━━━━━━━━━━━━━━━━━━━━━━━━━━━━━━━━━━━━━━━━━━━━━━━━━━━━━━━━━━━━━━━━━━━━━━━━━━━━━━━━━━━━━━━━━━━━━━━━━━━━━━━━━━━━━━━━━━━━━━━━━━━━━━━━━━━━━━━━━━━━━━━━━━━━━━━━━━━━━━━━━━━━━━━━━━━━━ 26/26 0:00:00
build op...   ━━━━━━━━━━━━━━━━━━━━━━━━━━━━━━━━━━━━━━━━━━━━━━━━━━━━━━━━━━━━━━━━━━━━━━━━━━━━━━━━━━━━━━━━━━━━━━━━━━━━━━━━━━━━━━━━━━━━━━━━━━━━━━━━━━━━━━━━━━━━━━━━━━━━━━━━━━━━━━━━━━━━━━━━━━━━━━━━━━━━━━ 46/46 0:00:00
add ddr swap...   ━━━━━━━━━━━━━━━━━━━━━━━━━━━━━━━━━━━━━━━━━━━━━━━━━━━━━━━━━━━━━━━━━━━━━━━━━━━━━━━━━━━━━━━━━━━━━━━━━━━━━━━━━━━━━━━━━━━━━━━━━━━━━━━━━━━━━━━━━━━━━━━━━━━━━━━━━━━━━━━━━━━━━━━━━━━━━━━━━━ 45/45 0:00:00
calc input dependencies...   ━━━━━━━━━━━━━━━━━━━━━━━━━━━━━━━━━━━━━━━━━━━━━━━━━━━━━━━━━━━━━━━━━━━━━━━━━━━━━━━━━━━━━━━━━━━━━━━━━━━━━━━━━━━━━━━━━━━━━━━━━━━━━━━━━━━━━━━━━━━━━━━━━━━━━━━━━━━━━━━━━━━━━━━ 56/56 0:00:00
calc output dependencies...   ━━━━━━━━━━━━━━━━━━━━━━━━━━━━━━━━━━━━━━━━━━━━━━━━━━━━━━━━━━━━━━━━━━━━━━━━━━━━━━━━━━━━━━━━━━━━━━━━━━━━━━━━━━━━━━━━━━━━━━━━━━━━━━━━━━━━━━━━━━━━━━━━━━━━━━━━━━━━━━━━━━━━━━ 56/56 0:00:00
assign eu heuristic   ━━━━━━━━━━━━━━━━━━━━━━━━━━━━━━━━━━━━━━━━━━━━━━━━━━━━━━━━━━━━━━━━━━━━━━━━━━━━━━━━━━━━━━━━━━━━━━━━━━━━━━━━━━━━━━━━━━━━━━━━━━━━━━━━━━━━━━━━━━━━━━━━━━━━━━━━━━━━━━━━━━━━━━━━━━━━━━ 56/56 0:00:00
assign eu onepass   ━━━━━━━━━━━━━━━━━━━━━━━━━━━━━━━━━━━━━━━━━━━━━━━━━━━━━━━━━━━━━━━━━━━━━━━━━━━━━━━━━━━━━━━━━━━━━━━━━━━━━━━━━━━━━━━━━━━━━━━━━━━━━━━━━━━━━━━━━━━━━━━━━━━━━━━━━━━━━━━━━━━━━━━━━━━━━━━━ 56/56 0:00:00
assign eu greedy   ━━━━━━━━━━━━━━━━━━━━━━━━━━━━━━━━━━━━━━━━━━━━━━━━━━━━━━━━━━━━━━━━━━━━━━━━━━━━━━━━━━━━━━━━━━━━━━━━━━━━━━━━━━━━━━━━━━━━━━━━━━━━━━━━━━━━━━━━━━━━━━━━━━━━━━━━━━━━━━━━━━━━━━━━━━━━━━━━━ 56/56 0:00:00
2024-12-10 14:38:30.823 | INFO     | yasched.test_onepass:results2model:2593 - clear job deps
2024-12-10 14:38:30.823 | INFO     | yasched.test_onepass:results2model:2594 - max_cycle = 81,026
build jobs   ━━━━━━━━━━━━━━━━━━━━━━━━━━━━━━━━━━━━━━━━━━━━━━━━━━━━━━━━━━━━━━━━━━━━━━━━━━━━━━━━━━━━━━━━━━━━━━━━━━━━━━━━━━━━━━━━━━━━━━━━━━━━━━━━━━━━━━━━━━━━━━━━━━━━━━━━━━━━━━━━━━━━━━━━━━━━━━━━━━━━━━━ 56/56 0:00:00
2024-12-10 14:38:30.847 | INFO     | yamain.command.npu_backend_compiler:compile:209 - assemble model [1] [subgraph_npu_1] b1
2024-12-10 14:38:30.890 | INFO     | yamain.command.npu_backend_compiler:compile:228 - generate gt of npu graph [subgraph_npu_1]
2024-12-10 14:38:31.797 | INFO     | yamain.command.npu_backend_compiler:check_assembled_model:376 - simulate npu graph [subgraph_npu_1_b1]
2024-12-10 14:38:32.352 | SUCCESS  | yamain.common.util:check_data:206 - check npu graph [subgraph_npu_1_b1] [op_5:AxQuantizedConv_out], (1, 56, 56, 144), uint8 successfully!
可以看到编译子图 1 时,因为开启了 check 选项配置,进行了输出结果检查。
最终输出的
compiled.axmodel中也出现了三个 NPU 子模型,分割三个模型的 tensor 名即为子图编译选项中指定的名称。
9.15. Transformer模型配置详解#
针对Transformer模型,可以通过 quant.transformer_opt_level 来设置不同等级的优化。
目前支持设置 0, 1, 2 三个等级。
下面以 Swin-T 模型示例,配置如下:
"quant": {
    "input_configs": [
      {
        "tensor_name": "DEFAULT",
        "calibration_dataset": "dataset.tar",
        "calibration_format": "Image",
        "calibration_size": 32,
        "calibration_mean": [123.68, 116.779, 103.939],
        "calibration_std": [58.62, 57.34, 57.6]
      }
    ],
    "calibration_method": "MSE",
    "transformer_opt_level": 2 # 设置transformer优化等级为2
},
使用 pulsar2 build 转换模型会出现以下日志,说明配置修改成功:
INFO[0176] Transformer optimize level: 2
下表是 Swin-T 在不同优化等级下的精度和性能表现 ,该模型浮点精度(acc1)为 81.2%
优化等级 |
精度(acc1) |
耗时 |
|---|---|---|
1 |
80.488% |
7.266ms |
2 |
80.446% |
7.114ms |
备注
当前版本建议设置等级 1, 在实测中等级 2 较等级 1 的性能提升幅度较小,而等级 1 的精度要略优。
备注
目前已经验证过的模型有 Swin 系列, SwinV2 系列, Deit 系列, Vit 系列。
9.16. Quantized ONNX 模型导入#
为了支持客户自行量化的模型(包括 4 bit QAT 量化),AX650 M76H 支持量化后的 Quantized ONNX 格式的模型作为输入。模型格式采用了 ONNX QDQ 格式。
下面以 resnet50 和 yolov5s 4w8f 模型为例,演示如何对 Quantized ONNX 格式的模型进行编译。
首先请下载我们已经转换好的模型,点击下载 resnet50,点击下载 yolov5s
然后对 resnet50 使用如下的配置文件:
{
  "model_type": "QuantONNX",
  "npu_mode": "NPU1",
  "quant": {
    "input_configs": [
      {
        "tensor_name": "DEFAULT",
        "calibration_dataset": "s3://npu-ci/data/dataset_v04.zip",
        "calibration_size": 64,
        "calibration_mean": [103.939, 116.779, 123.68],
        "calibration_std": [1.0, 1.0, 1.0]
      }
    ],
    "calibration_method": "MinMax"
  },
  "input_processors": [
    {
      "tensor_name": "data",
      "src_format": "BGR",
      "src_dtype": "U8",
      "src_layout": "NHWC"
    }
  ],
  "compiler": {
    "check": 0
  }
}
最后使用 pulsar2 build 命令进行编译,即可得到 compiled.axmodel 文件。
pulsar2 build --target_hardware AX650 --input path/to/model.onnx --config path/to/config.json --output_dir output
提示
在配置文件中通过 "model_type": "QuantONNX" 指定输入模型的类型为 Quantized ONNX。
使用类似的方法,我们可以对 yolov5s Quantized ONNX 格式的模型进行编译,只需要替换成如下的配置文件进行编译即可:
{
  "model_type": "QuantONNX",
  "npu_mode": "NPU1",
  "quant": {
    "input_configs": [
      {
        "tensor_name": "DEFAULT",
        "calibration_dataset": "s3://npu-ci/data/coco_calib_image.tar",
        "calibration_size": 32,
        "calibration_mean": [0, 0, 0],
        "calibration_std": [255.0, 255.0, 255.0]
      }
    ],
    "layer_configs": [
      {
        "op_type": "Silu",
        "data_type": "U16"
      }
    ],
    "calibration_method": "MSE"
  },
  "input_processors": [
    {
      "tensor_name": "DEFAULT",
      "tensor_format": "RGB",
      "tensor_layout": "NCHW",
      "src_format": "BGR",
      "src_layout": "NHWC",
      "src_dtype": "U8"
    }
  ],
  "compiler": {
    "check": 0
  }
}
9.17. 色彩空间转换配置#
支持客户通过配置在模型中添加色彩空间转换功能,由 NPU 完成从 YUV 色彩空间到 RGB 色彩空间的转换。详细配置请参考 《预处理、后处理参数说明》
{
  "input_processors": [
    {
      "tensor_name": "DEFAULT",
      "tensor_format": "BGR",
      "src_format": "YUV420SP",   # 指定编译后模型的输入色彩空间
      "src_dtype": "U8",
      "src_layout": "NHWC",
      "csc_mode": "LimitedRange"
    }
  ]
}
注意
目前不支持 RGB 到 BGR 或者 BGR 到 RBG 的转换。
9.18. 高级量化策略配置详解#
支持客户配置高级量化策略,目前支持 ADAROUND LSQ BRECQ 等量化策略,这类量化策略通过在数据集上微调权重以及激活值,往往可以获得较好的精度。
使用时需要机器中有支持 CUDA 的 GPU ,在启动 docker 也需要增加对 gpu 的支持,参考命令如下:
sudo docker run -it --net host --rm --runtime=nvidia --gpus all -v $PWD:/data pulsar2:${version}
配置参考如下:
{
  "quant": {
    "input_configs": [
      {
        "tensor_name": "DEFAULT",
        "calibration_dataset": "dataset.tar",
        "calibration_format": "Binary", # 建议使用 binary,以保证预处理与推理时一致,使得微调后与浮点模型接近,获得更好的精度
        "calibration_size": 128, # calibration size, 建议128-512张
      }
    ],
    "calibration_method": "MinMax",
    "enable_adaround": true, # 使能 adaround量化策略
    "finetune_block_size": 3, # 设置 block size
    "finetune_lr": 1e-4, # 设置学习率
    "finetune_epochs": 100, # 设置微调 epoch,lsq和brecq建议设置为10,adaround建议设置为50
    "device": "cuda:0"
},
当出现如下 log 时,说明该策略设置成功:
Calibration Progress(Phase 1): 100%|███████████████████████████████████████████████████████████████████| 128/128 [00:01<00:00, 20.16it/s]
[16:40:41] AX Adaround Reconstruction Running ...

Check following parameters:
Is Scale Trainable:        True
Interested Layers:         []
Collecting Device:         cuda
Num of blocks:             51
Learning Rate:             0.0001
Steps:                     50
Gamma:                     1.0
Batch Size:                1

# Block [1 / 51]: [['207'] -> ['211']]
# Tuning Procedure : 100%|█████████████████████████████████████████████████████████████████████████████| 50/50 [00:11<00:00,  4.55it/s]
# Tuning Finished  : (0.0185 -> 0.0065) [Block Loss]

# Block [2 / 51]: [['211'] -> ['213']]
# Tuning Procedure : 100%|█████████████████████████████████████████████████████████████████████████████| 50/50 [00:06<00:00,  8.23it/s]
# Tuning Finished  : (0.0014 -> 0.0011) [Block Loss]
注意
当前 docker 中 torch 版本为 2.5, cuda 版本为 11.8 , 使用时需要注意机器是否兼容。